Salesforce Source Connector
The Salesforce source connector lets DataSync retrieve data from Salesforce and load it into your data warehouse. Setup involves two parts that reference each other: you create an external client app in Salesforce to grant DataSync access, then create a source connection in DataSync using the credentials from that app. It helps to keep both Salesforce and DataSync open side by side while you work through the steps.
DataSync supports two authentication modes for Salesforce: OAuth Headless and OAuth with PKCE. PKCE (Proof Key for Code Exchange) adds an extra verification layer that protects against authorization code interception, making it the recommended choice for most setups.
Once your source connection is ready, configure your destination connection to finish the setup.
Some steps apply only to PKCE setups and are marked with a badge accordingly.
Step 1: Configure a external client app in Salesforce
Create an external client app
- Log in to Salesforce.
- Select the gear icon at the top right, then Setup.
- Under Platform Tools, expand Apps, then select App Manager.
- Select New External Client App in the upper-right corner.
- Fill in all required fields under Basic Information.
- Under API (Enable OAuth Settings), check Enable OAuth.
- In Callback URL, paste the callback URL shown in the connection properties in DataSync.
- In Available OAuth Scopes, select the scopes your team needs. For PKCE, select:
- Manage user data via APIs
- Perform requests at any time
- For PKCE setups, check Require Proof Key for Code Exchange (PKCE).
- Click Create.
Retrieve your app credentials
- Under Platform Tools, expand Apps.
- Expand External Client Apps and select OAuth Usage.
- Select your app.
- Open the Settings tab, then expand OAuth Settings.
- Select Consumer Key and Secret.
- Copy the Consumer Key (used as your Client ID in DataSync) and the Consumer Secret (used as your Client Secret). You'll need both in the next step.
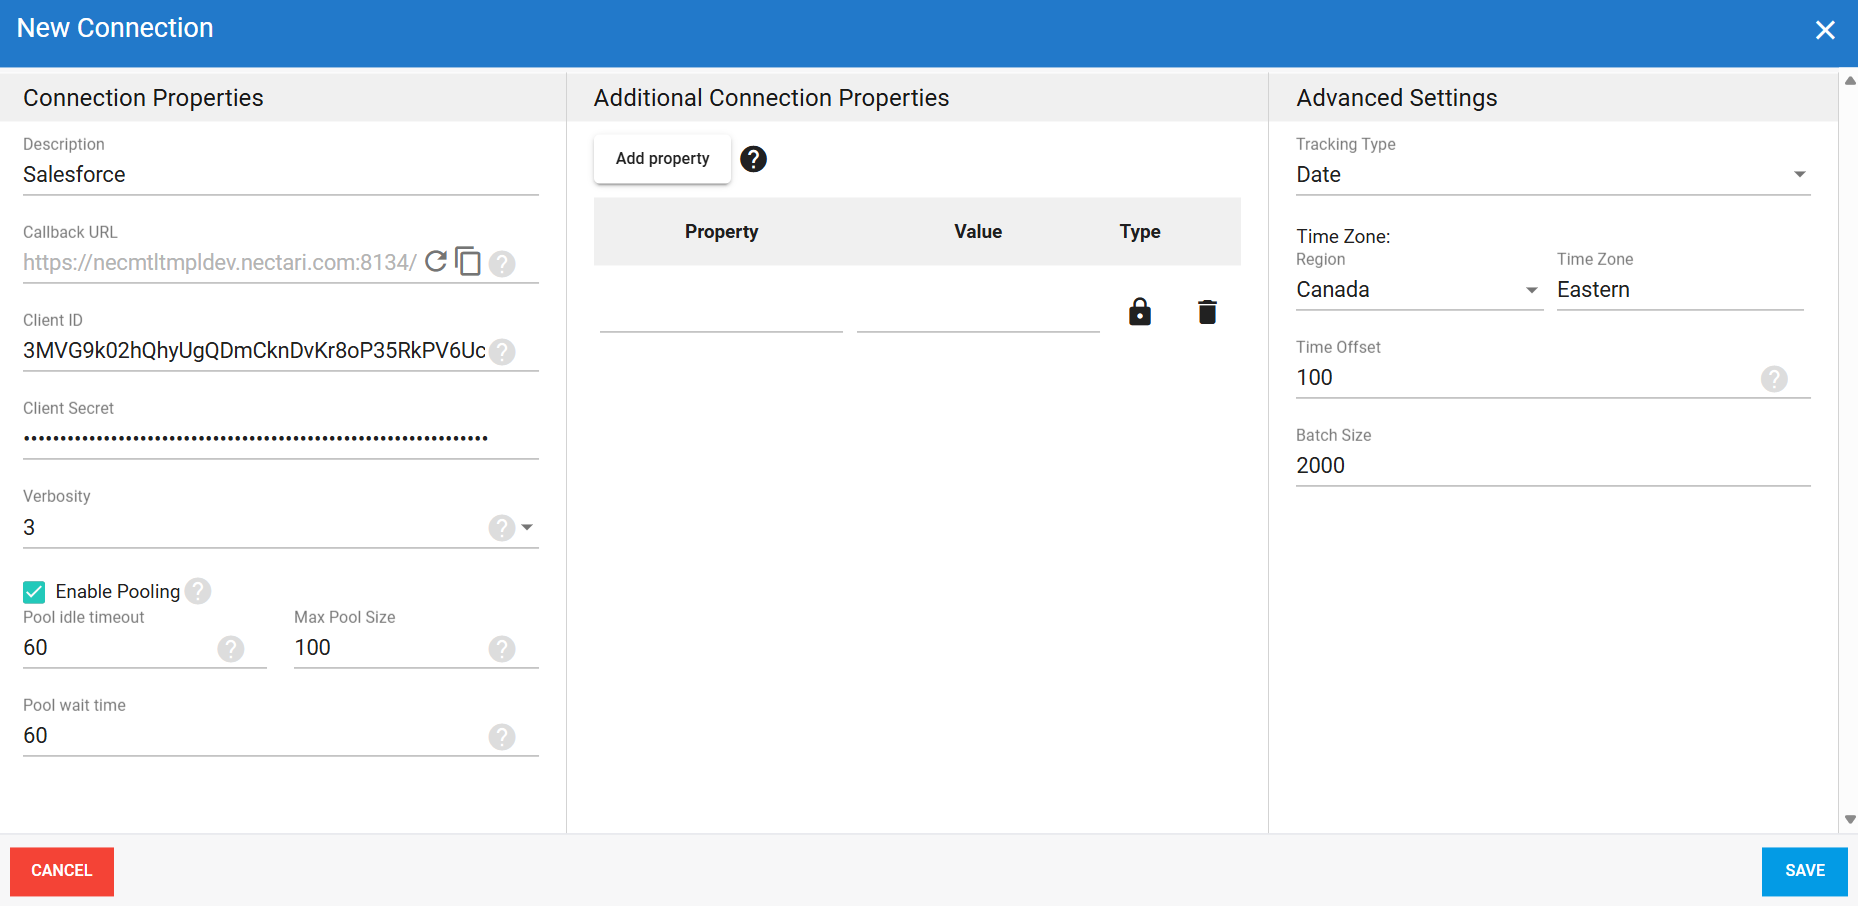
Step 2: Create the source connection in DataSync
- Log in to DataSync.
- From the welcome screen, select Connections.
- Next to Source Connections, click New.
- Select Salesforce.
- Enter all required connection properties.
- (Optional) In the Additional Connection Properties panel, click Add property and enter any extra parameters you need.
- Configure the advanced settings to match your environment, including Tracking Type.
- Wait 2 to 10 minutes before saving so Salesforce can fully register the new app.
- Click Save.
Salesforce needs 2 to 10 minutes to fully register the new app. If you save the DataSync connection too soon, you'll see an invalid_client_id error. If so, edit the connection and select Authenticate and Save, then Allow to complete the setup.
Connection properties
| Property | What to enter |
|---|---|
| Description | Unique name for the connection. Example: Salesforce. |
| Authentication Mode | Choose OAuthHeadless or OAuthPKCE. |
| Callback URL | Redirect URL automatically generated by DataSync. Paste it into your external client app in Salesforce. |
| Client ID | Consumer Key from your external client app. Example: 3MVG9k02hQhyUgQDmCknDvKr8oP35RkPV6Uc4j7vP9KQH8bM2NwL1JpYz853vQrc2bN1aD6yR5tK9pE4mW0fG. |
| Client Secret | Consumer Secret from your external client app. Example: 7B6F9C8F2E1A5BZC9D0E3F4A7B6C7D8E9F0G1B2C3D4E5FEA7B8C9D0E1F293B4C. |
| Authorization URL | PKCE only Replace hostname with your Salesforce host domain.Example: https://hostname/services/oauth2/authorize. |
| Access Token URL | PKCE only Replace hostname with your Salesforce host domain.Example: https://hostname/services/oauth2/token. |
| Scope | PKCE only Scopes matching the Selected OAuth Scopes in your Salesforce app: api, offline_access, and refresh_token. |
| Verbosity | Controls how much detail the connector writes to the log. Each level includes everything from the level below it, plus additional detail.
|
Additional connection properties
Use this panel to enter connection string properties not available in the Connection Properties panel. For sensitive values such as passwords, set the type to Encrypted. The value is hidden in the interface and stored encrypted in the back end.
| Property | What to enter |
|---|---|
| Property | Connection string property that defines the action or behavior. Example: ReadOnly |
| Value | Value for the property. Example: True |
| Type | Visibility settings: Visible or Encrypted. |
Advanced settings
These settings control how the connector tracks data changes, handles time and regional configuration, and processes records during extraction. Configure them to match your Salesforce environment so that results stay accurate and consistent.
| Setting | What to select |
|---|---|
| Tracking Type | Method for tracking data changes: None or Date. |
| Region | Region setting for the connector, if required by your setup. |
| Time Zone | Time zone matching your Salesforce environment. |
| Time Offset | Refresh offset in seconds to compensate for timing issues in record selection. Minimum 0, maximum 3600. |
| Batch Size | Number of records processed per batch during extraction. Larger batches can improve performance but use more memory. Default is 2000, maximum is 10000. Adjust based on your network speed and disk performance. The default works well in most cases. |
Example setup
Update the callback URL on an existing app
If your app is already configured and you only need to update the callback URL:
- Log in to Salesforce.
- Select the gear icon at the top right, then Setup.
- Under Platform Tools, expand Apps, then External Client Apps.
- Select OAuth Usage.
- Choose your app, then open the Settings tab.
- Click Edit in the top-right corner.
- Update the Callback URL.
- Click Save.