Acumatica Source Connector
The Acumatica source connector in DataSync lets DataSync retrieve data from one or more Acumatica tenants and load it into your data warehouse. In Acumatica, tenants represent individual companies. You need at least one tenant configured before setting up the connection.
Before creating source connections in DataSync, make sure your Acumatica environment is correctly configured. The time zone in Acumatica must match the time zone you specify in DataSync, otherwise synchronization issues can occur. DataSync supports two authentication modes: Basic and OAuth 2.0. For OAuth 2.0, you also need to register a connected application in Acumatica to generate the credentials required for the connection. It helps to keep both Acumatica and DataSync open side by side while you work through the steps.
Creating two source connections per tenant is the recommended setup: a refresh connection that uses date tracking for incremental loads based on the LastModifiedDate field, and a no refresh connection for tables without a tracking field, typically smaller reference tables. If you are setting up Acumatica for the first time, the
Acumatica installation guide walks you through creating both connections as part of the full setup.
You need to import and publish the Nectari customization project in Acumatica before setting up the connection. See Upload Project into Acumatica for details.
After creating all required source connections, configure your destination connection to finalize the setup.
Step 1: Configure Acumatica
Review tenants
- Log in to Acumatica.
- From the main menu, select System Management. If not visible, click More Items.
- Under System Maintenance, select Tenants to see all tenants registered in your instance.
Confirm the time zone
- Select the profile icon in the upper-right corner.
- Click My profile.
- In General Info, note the time zone.
Create the Client ID and Client Secret
The following steps apply to OAuth 2.0 setups only. If you are using Basic authentication, skip to Step 2.
- In Acumatica, select Integration. If not visible, click More Items.
- Under Preferences, select Connected Applications.
- Click the + icon to add a new record.
- In Client Name, enter
OAuthor another unique name. - In Flow, select Authorization Code.
- Click Save. The Client ID is generated automatically.
- Select the Secrets tab and click Add Shared Secret.
- Enter a description.
- Copy the value in Value and store it securely.
- Click Ok.
Step 2: Create the source connection in DataSync
Set up the connection
- Log in to DataSync.
- From the welcome screen, select Connections.
- Next to Source Connections, click New.
- Select Acumatica.
- Enter all required connection properties.
- Copy the full Callback URL from the connection panel.
Add the callback URL in Acumatica
- In Acumatics, select Integration. If not visible, click More Items.
- Under Preferences, select Connected Applications.
- In Client ID, Select the connected application you created.
- Select the Redirect URIs tab.
- Click the + icon to add a row.
- Paste the URL into the new row.
- Click Save.
Authenticate and authorize
- Enter all required connection properties.
- (Optional) In the Additional Connection Properties panel, click Add property and enter any extra parameters you need.
- Configure the advanced settings to match your environment, including Tracking Type.
- Click Save.
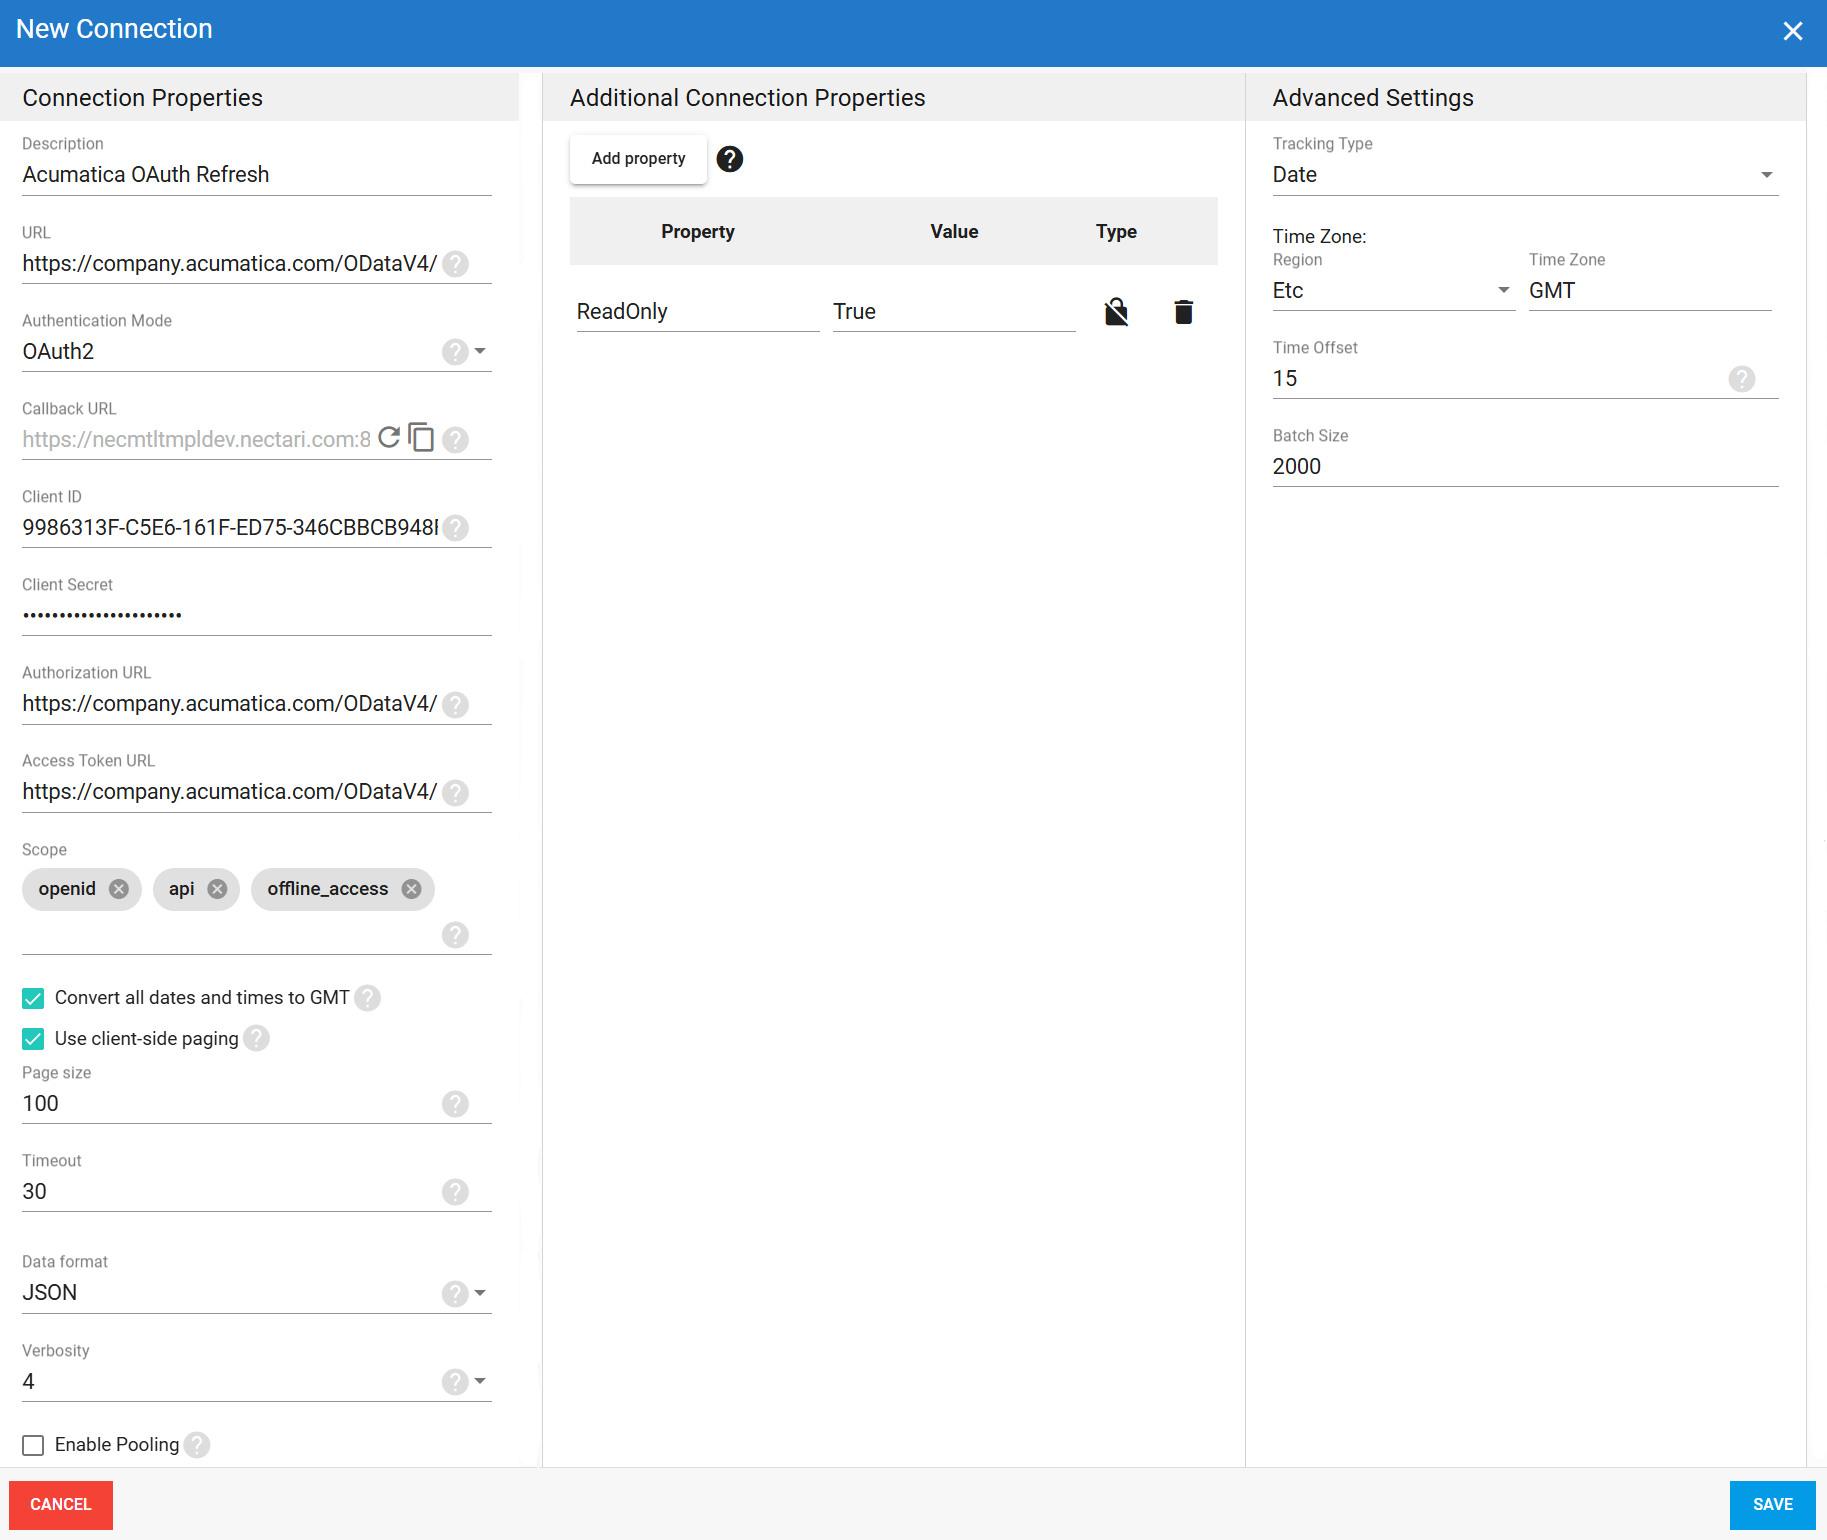
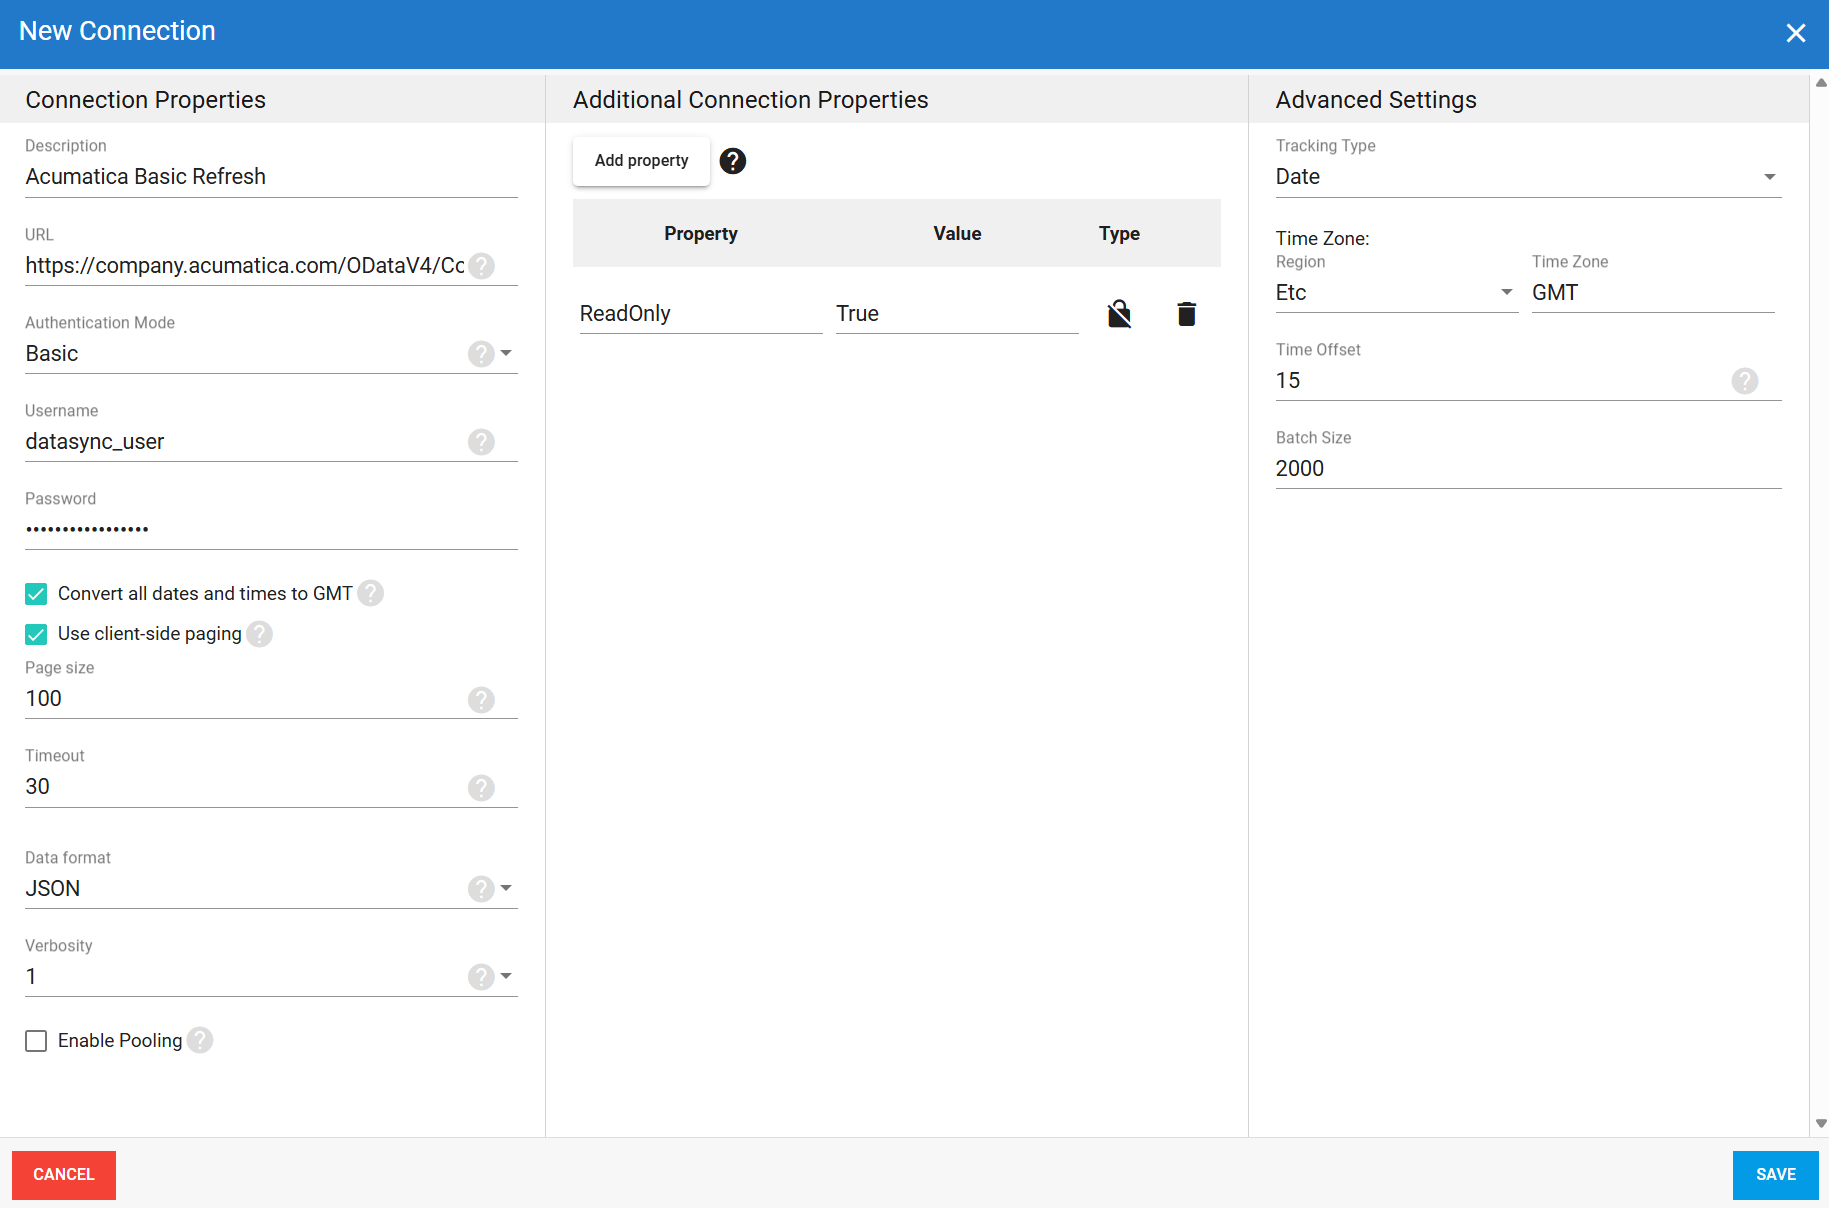
Connection properties
| Property | What to enter |
|---|---|
| Description | Unique name for the connection. Example: Acumatica Refresh |
| URL | Acumatica instance URL. Keep %20 for spaces as shown in your browser. Example: https://company.acumatica.com/ODataV4/InstanceName |
| Authentication Mode | Basic or OAuth2. |
| Username | Basic only Login account with the required API permissions. |
| Password | Basic only Password for this account. |
| Callback URL | OAuth only Redirect URL automatically generated by DataSync. Must be added to the Connected App in Acumatica. |
| Client ID | OAuth only Identifier assigned when registering the connected application. Example: 9986313F-C5E6-161F-ED75-346CBBCB948F@Company |
| Client Secret | OAuth only Secret assigned for the connected application. Example: ZIRz91x0ZSn_bunidUlZsB |
| Authorization URL | OAuth only URL used to obtain the authorization code. Add identity/connect/authorize to your base Acumatica URL. Example: https://company.acumatica.com/ODataV4/identity/connect/authorize |
| Access Token URL | OAuth only URL used to exchange the authorization code for an access token. Add identity/connect/token to your base Acumatica URL. Example: https://company.acumatica.com/ODataV4/identity/connect/token |
| Scope | OAuth only Permissions requested from Acumatica. Default: openid, api, offline_access. |
| Convert all dates and times to GMT | Converts all DateTime values to GMT. Recommended when your Acumatica environment runs in a different time zone and you need consistent timestamps across your data. |
| Use client-side paging | Enables client-side paging for large datasets. When enabled, data is retrieved in pages rather than all at once. |
| Page Size | Maximum number of results returned per page when client-side paging is enabled. Larger values return more rows per page but may increase timeout risk. |
| Timeout | Time in seconds to wait before a connection attempt or query execution times out. |
| Data format | Format for retrieved data: ATOM or JSON. |
| Verbosity | Controls how much detail the connector writes to the log. Each level includes everything from the level below it, plus additional detail.
|
| Enable Pooling | Enables connection pooling, which keeps a set of database connections open and reuses them across extractions instead of opening a new connection each time. This reduces overhead and improves performance when multiple extractions run at the same time. |
| Pool idle timeout | Time in seconds a connection can stay idle before returning to the pool. |
| Max Pool Size | Maximum number of connections allowed in the pool at the same time. |
| Pool wait time | Time in seconds DataSync waits for an available connection before throwing an error. |
Additional connection properties
Use this panel to enter connection string properties not available in the Connection Properties panel. For sensitive values such as passwords, set the type to Encrypted. The value is hidden in the interface and stored encrypted in the back end.
| Property | What to enter |
|---|---|
| Property | Connection string property that defines the action or behavior. Example: ReadOnly. |
| Value | Value for the property. Example: True. |
| Type | Visibility settings: Visible or Encrypted. |
Advanced settings
These settings control how the connector tracks data changes, handles time and regional configuration, and processes records during extraction. Configure them to match your Acumatica environment so that results stay accurate and consistent.
| Setting | What to select |
|---|---|
| Tracking Type | Method for tracking data changes: None or Date. |
| Region | Region setting for the connector, if required by your setup. |
| Time Zone | Time zone matching your Acumatica environment. |
| Time Offset | Refresh offset in seconds to compensate for timing issues in record selection. Minimum 0, maximum 3600. |
| Batch Size | Number of records processed per batch during extraction. Larger batches can improve performance but use more memory. Default is 2000, maximum is 10000. Adjust based on your network speed and disk performance. The default works well in most cases. |
Basic authentication example setup
OAuth authentication example setup