Data Extraction Wizard
The Data Extraction Wizard extracts raw data from a data model into a structured table in your workbook. You select the fields you need, apply filters, and the wizard generates a table that you can then format, add formula columns to, and adjust with custom headers. Your formatting and formulas are preserved after each data refresh, so you don't have to redo them every time the data updates.
Column formatting is based on the styling applied to the first row and carried across the entire column. Row level formatting is also maintained through refreshes. You can also drill down on an extraction to get more specific information about the formulas in the extraction.

When to create a data extraction
- Build custom report layouts by selecting specific fields from a data model and arranging them in the order you need.
- Work with raw data when you need individual rows rather than aggregated values from a pivot table or formula.
- Add calculated columns next to the extracted data using formulas or the Formula Wizard, and have them preserved through refreshes.
Perform a data extraction
- Select an empty cell.
- On the Analysis tab, select Data Extraction Wizard.
- Select the environment and data Model.
- Enter a name in the Extraction Name field.
- On the Fields tab, search for or select the fields you want to include.
- (Optional) Add filters or groups.
- Click Create. A table is generated based on your selections.
Each column header in a data extraction must have a unique name. Duplicate names are not allowed.
For a complete walkthrough, see Data Extraction Example.
Data extraction properties
| Property | What to configure |
|---|---|
| Environment | The environment to pull data from. If set to Current Environment, data is pulled from whichever environment is active. |
| Data Model | The data model to extract data from. |
| Extraction Name | A unique name for the extraction. Must be unique across the workbook and can only contain alphanumeric characters and underscores. |
Select and configure fields
The Fields tab is where you choose which dimensions, descriptions, and measures to include in the extraction. Search for a field in the left panel, then drag it or double click it to add it to the center area.
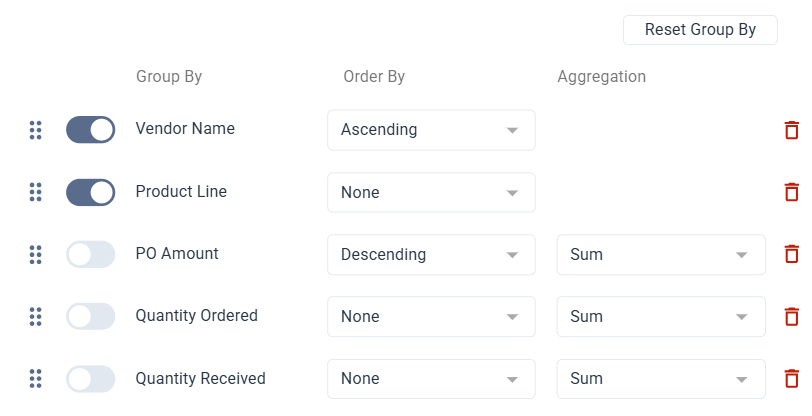
- Group By determines whether this field is used to group rows. When off, it’s included in the results but doesn’t create groups.
- Order By controls how grouped data is sorted.
- Aggregation reduces the number of rows by applying an operation to the field before the extraction processes it. The extraction calculations are based on this aggregated result, not on raw data.
This extraction pulls purchase order totals grouped by vendor and product line for Q3 and Q4 of 2024. PO Amount is sorted descending so the largest spending items appear first. Quantities ordered and received are summed per group to show fulfillment alongside spending.
The extraction returns one row per vendor and product line combination, with total PO amount and quantities summed. From there, you can add a formula column to calculate the percentage received (Quantity Received divided by Quantity Ordered) directly in the sheet.
With Group By on for Vendor Name and Product Line, the extraction returns one row per combination instead of one row per transaction.
Options
| Option | Description |
|---|---|
| Refresh on Open | Automatically refreshes the extraction when the workbook is opened. |
| Automatic Refresh | Automatically refreshes the extraction when a related filter value changes. |
| Show Headers | Shows column headers in the data extraction. |
| Show Total Rows | Shows the total row at the bottom of the data extraction. |
| Top X | Limits the number of rows returned by the extraction. |
| Worksheet | Controls where the extraction is placed:
|
| Location | The cell where the extraction is inserted. Shown when using an existing worksheet. |
Add filters to an extraction
Filters narrow what data the extraction includes. You can add individual filters or filter groups, and combine them with And / Or logic. For each filter, you select a field, an operator, and a value.
- Individual filters target a single condition.
- Groups wrap multiple filters together so they are evaluated as one unit.
Values can be entered manually or by referencing a cell. You can also search for a specific value using the prompt icon next to a filter. Select a filter method from the prompt to search, or use wildcards for more precise matching.
Enter filter values
Each filter value can be entered as a text string or as a cell reference. The behavior depends on how the value field is configured.
| Mode | How it works | How to set it |
|---|---|---|
| Cell reference | The value is pulled dynamically from a cell in your sheet. The extraction updates when the cell value changes. | Select the underscore in the value field, then select the cell in your sheet. |
| Text string | The value is typed directly and stays fixed regardless of what's in your sheet. | Select the A icon next to the value field. When active, the icon turns blue. |
If you use the prompt to select a value, it is automatically set as a text string.
Search values with wildcards
Wildcards and expressions apply only to text values, not numbers. To use them, select the prompt icon next to a filter and choose wildcards from the filter method. These expressions work with the Equal, Not Equal, In List, and Not In List operators.
Supported wildcards
?matches exactly one character*matches one or more characters!excludes characters or ranges;separates multiple values&combines conditions[a:b]defines a range between two values"..."treats special characters as literal text
| Example | What it matches |
|---|---|
4000 | Matches exactly 4000. |
4000;5000;6000 | Matches 4000, 5000, or 6000. |
4* | Matches any value starting with 4. |
4??? | Matches values starting with 4 with exactly four characters. |
A*&*Z | Matches values that start with A and end with Z. |
[4000:4999] | Matches values between 4000 and 4999. |
[A*:F*] | Matches values from A through F using prefix matching. |
!4000 | Excludes 4000. |
!4* | Excludes values starting with 4. |
!4??? | Excludes values starting with 4 with exactly four characters. |
[10000:10200]!10100 | Matches values between 10000 and 10200, but excludes 10100. |
!1000;2000;7000 | Excludes 1000, 2000, and 7000. |
"10:00" | Matches the literal value 10:00 (: is not treated as a range operator here). |
[4???:5???] | ERROR ? inside a range bound is not supported. |
[A*B:C] or [**:C] | ERROR * in the middle of a range bound or multiple * in a range bound are not supported. |
Customize an extraction
After creating an extraction, you can customize it further with hyperlinks, custom headers, and adjacent formula columns.
- Add clickable hyperlinks
- Customize the header
- Add adjacent columns
Add clickable hyperlinks
If a field is configured with a hyperlink format in the data model, its values appear as clickable links in the extraction results. Selecting a link opens the address in your default browser.
Hyperlinks work only when a field value starts with http:// or https://. Other formats such as Markdown, HTML tags, or custom link syntax are not supported.
Customize the header
You can replace the default column headers with custom names. Default headers are generated from field descriptions in the data model. Custom headers are preserved after refreshes and are not overwritten by the original field names.
Add adjacent columns
You can add formula columns next to the extraction. Formulas created with the Formula Wizard or standard Excel syntax are included in the extraction definition when the cell starts with =.
To reorder columns (including adjacent ones):
- Select the data extraction.
- On the Analysis tab, select Data Extraction Wizard.
- In Fields, drag the field to the position you want using the reorder icon.
- Select Update.
Copy a data extraction
- Select the cell that contains the data extraction you want to copy.
- Right-click the cell, point to Data Extraction, and select Copy Data Extraction.
- Select the empty cell where you want to paste the extraction.
- Right-click the empty cell, point to Data Extraction, and select Paste Data Extraction.
- Click Save.
Refresh a data extraction
Refreshing pulls the latest data from your data source so the extraction reflects current information.
- On the Toolbar, select Refresh.
- Make sure the Data Extractions toggle is on.
- Select one of the following:
- Entire Workbook to refresh all data extractions
- Current Worksheet to refresh only the active sheet
Drill down on a data extraction
If you have a drill down profile configured, you can drill down on a data extraction to see the detailed data behind a value. Drill down is only available on measure fields.
- Select a cell that contains a measure.
- On the Analysis tab, select Drill Down Wizard.
- Set the profile and the fields you want to use.
- Click Update to save changes to the profile only, or click Update and Drill Down to update the profile and display the drill down table on the right.
- Click Save.