Users
The Users page is where administrators create and manage user accounts in SEI. Each user has a user type that determines their license and what they can access. Most access configuration is done through groups rather than individual users: a user belongs to one or more groups, and the group holds the permissions, roles, and data model access.
From this page you can create users, assign them to groups, reset passwords, unlock accounts, impersonate a user for debugging, and enable or disable access without deleting an account.
License usage
The counters in the top-right corner show how many Viewer and Full licenses are currently in use under your subscription. Hover over either counter for a detailed breakdown.

- Total is the number of licenses available for that user type under your subscription.
- Used is the number of licenses currently assigned to active users.
- Available is the number of licenses not yet assigned.
Manage a user
| Action | What it does | |
|---|---|---|
 | Edit | Edit the selected user's details and settings. |
 | Copy Profile | Copy the selected user's settings and permissions. Use Paste New to create a new user with the same configuration. |
 | Delete | Permanently remove the user account. The ADMIN account cannot be deleted. |
 | Impersonate User | Sign in as another user without knowing their password. See Impersonate a user. |
 | Reset Password | Generate a temporary password. The user is prompted to set a new password at next login. |
 | Unlock | Unlock an account that was locked after five consecutive failed login attempts. |
 | Activate / Disable | Disable a user account without deleting it. The user cannot sign in until the account is re-enabled. |
 | Expire User Account | Mark the account as expired. The user must change their password at next login, or wait for an administrator to reactivate it. |
Create a new user
- In the navigation panel, select the gear icon to open the Administration section.
- Select Security, then Users.
- Click New.
- (Optional) If your organization uses Active Directory, expand Use Active Directory and fill in the domain and user fields.
- Complete all required fields.
- Expand Optional Fields and enter any custom values you want to store for this user.
- Click Create.
Users properties
| Field | What to enter |
|---|---|
| Use Active Directory | Optional Link the user to an Active Directory domain, or create a local SEI account. When enabled, select a configured domain and user from the dropdowns. When disabled, enter the domain, username, name, and email manually. |
| Domain | user's domain when connecting through Active Directory. |
| User Name | Unique username for this account. This is what the user types at login. |
| Name | Display name shown across the application. |
| User's email address. Used for password resets and distribution notifications. | |
| User Type | License type and access level for this user.
|
| General Role | Default general role that defines the user's overall permissions in SEI. |
| Default Data Model Role | Data model role automatically applied when the user accesses a new data model for the first time. |
| Display Level | Highest authorization level at which this user can view data model columns (0-99). |
| Edit Level | Highest authorization level at which this user can edit data model columns (0-99). |
| Language | User's default interface language. Also used for distribution output in multi-language environments. The user can change this at any time from their user settings. |
| Culture | Locale that controls how dates, times, and numbers are formatted, for example English - US. |
| Worksheet auto grey tones | When enabled, worksheet rows alternate between white and grey for easier reading. |
| Optional Fields | Optional Up to five additional fields can be used to store any custom information about the user directly in the SEI database, for example a cost center, an employee ID, or a region. These values are stored in the SEC_USER_SETTINGS table under fields SET09 to SET13 and can be queried or used in reports if needed. |
Language controls the interface, meaning labels, menus, and buttons appear in that language. Culture controls how values are formatted. For example, a user with Language set to French and Culture set to English - US sees the interface in French but dates formatted as MM/DD/YYYY and numbers with a period as the decimal separator.
Assign a user to a group
Assigning a user to a group is the recommended way to manage access. Permissions, roles, and data model access are configured on the group, and every member of that group inherits them automatically. You can always create more groups to specific users.
A new analyst joins the finance team. Instead of manually configuring their data model access, roles, and environment restrictions, they are added to the finance group. They automatically have the same access as every other finance analyst.
- Select the user from the user list.
- In the Groups section, select the group the user should belong to.
- Click the arrow button to move the group into the Member of section.
Impersonate a user
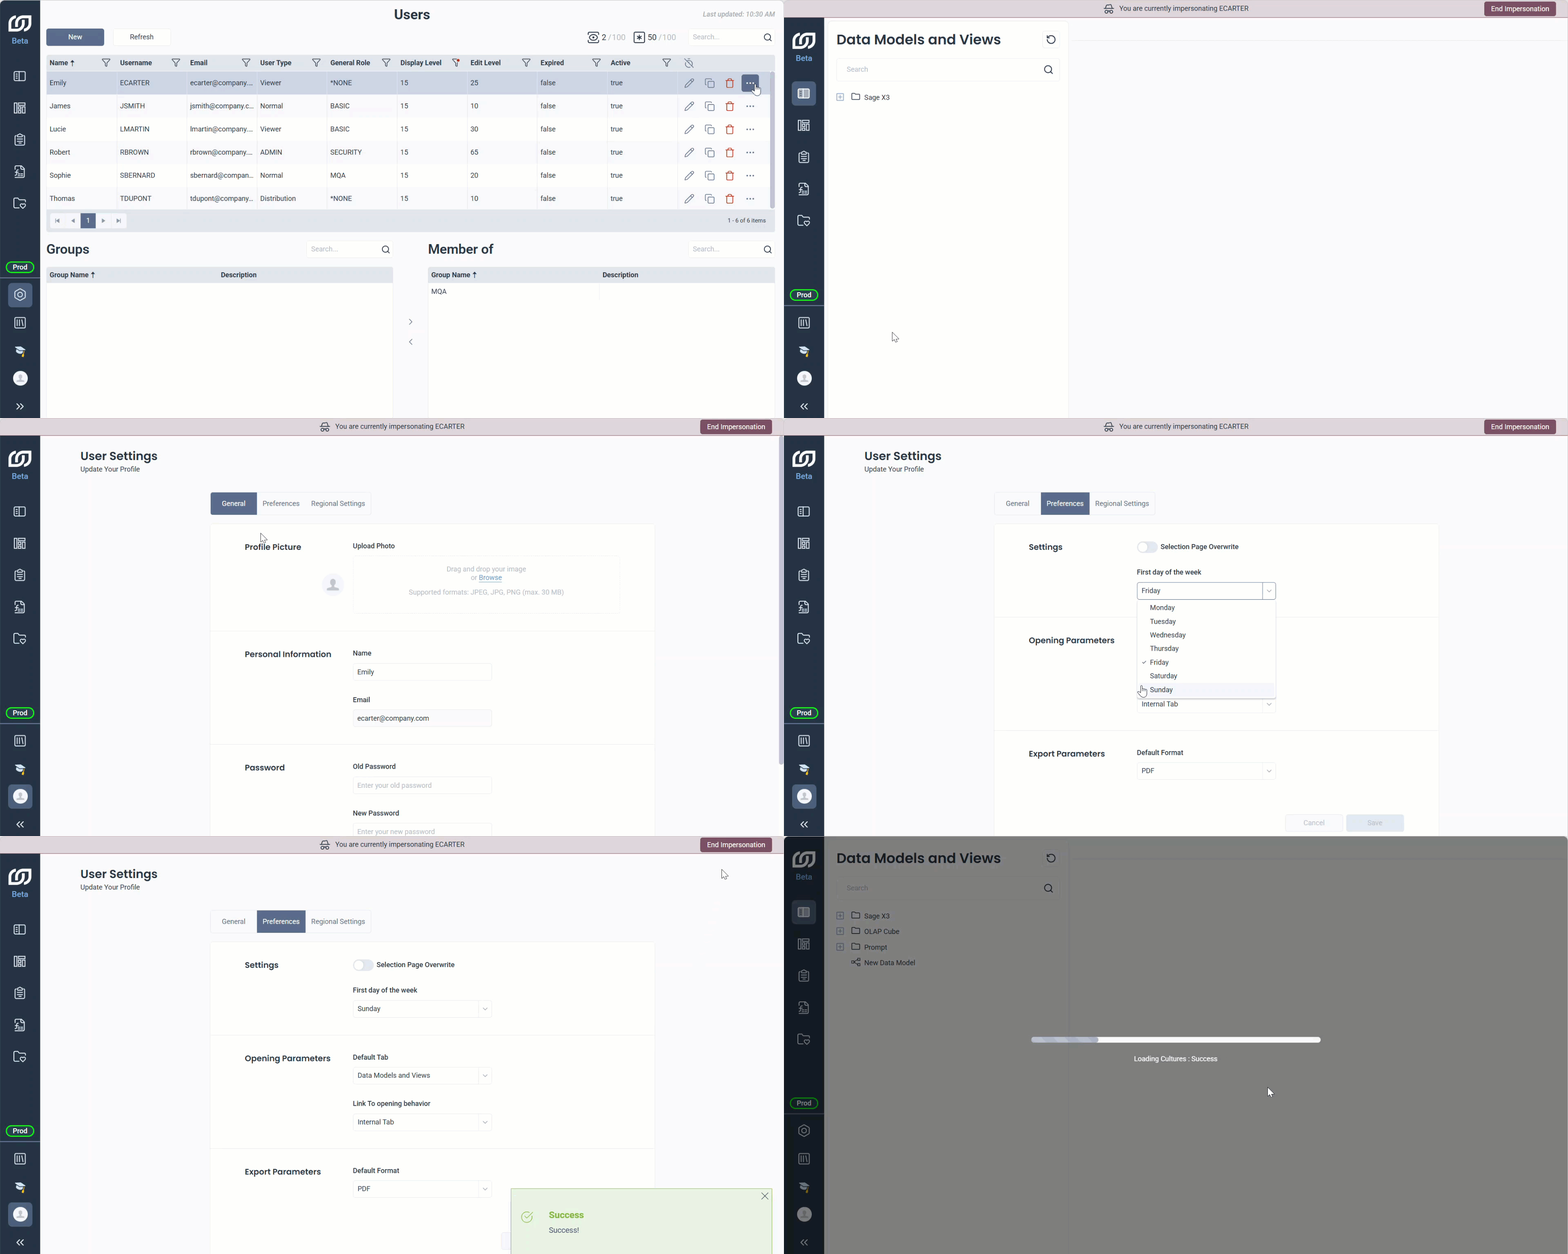
Impersonating a user signs you into SEI as that user, giving you their exact view of the application including their permissions, restrictions, environments, and data access. The original user is signed out when impersonation starts. If they try to sign back in while you are impersonating them, they will take over the session and you will be disconnected.
In the case of another person signing in to the admin account while you are impersonating someone else they can stil use the admin account like usual. However, when you stop impersonating, that second session is ended.
When to impersonate a user
- Verify restrictions and environments to confirm the user only sees what they are supposed to.
- Debug a reported issue by reproducing it under the exact conditions the user experiences.
- Configure user settings such as personal preferences or saved views.
Start impersonating
- In the Users page, select the user you want to impersonate.
- Click the Impersonate User icon.
- SEI reloads as that user. You can now navigate the application exactly as they would.
- To stop impersonating, select End Impersonation from the top banner.