Scenario 2: Consolidated for Sage Intacct
Configure Sage Intacct
DataSync connects to Sage Intacct through Web Services. Before you start the template installation, get a Web User License from Sage Intacct.
Activate Web Services
- Log in to Sage Intacct and expand Applications, then under Company, click Admin.
- Click Subscriptions, enable Web Services, then click Subscribe.
Give DataSync access
- Expand Company and click Overview in the right corner.
- Click Company Information, then Edit.
- Select the Security tab and click Manage filters.
- In Username, enter the company ID you use to log in, then click Add.
- Select the same username, then enter the IP address from the Sage Enterprise Intelligence team and click Save.
- Scroll down to Web Services authorizations and click Add.
- In Sender ID, enter
NectariMPPand click Save.
Create the role
- Expand Company and click Roles.
- Click Add, enter
Sage Enterprise Intelligence, then click Save. - Select Application or module to include all modules.
- Next to Administration, click Permissions, select Read only, then click Save.
- Repeat step 4 for each remaining module.
- Next to Platform Services, click Permissions, select List and Views, then click Save.
- Click Save again to save the role.
Create the user
- Expand Company and click Web Services users.
- Click Add, enter the User ID and Account email address, then select the Contact Name.
- Under Admin privileges, select Limited.
- In the Role table, click a line and select Sage Enterprise Intelligence.
- Click Save, then Create.
- Enter your Sage Intacct password and click Verify.
Enable audit tables
- Expand Company and select General Ledger in the sidebar.
- Select the Setup tab and click Configuration.
- Under Subledger transactions posted to GL, select Enable auditing of transactions posted from subledgers.
- Click Save.
Create opening periods
- Expand General Ledger and click Reporting periods.
- Click Add and fill in the fields:Name
Nectari Opening 20XXColumn headerNectari Opening 20XXStart date01/01/20XXEnd date12/31/20XX - Click Save, then repeat for every reporting year you need.
Configure DataSync for Sage Intacct
Add a source with refresh
- Log in to DataSync, then click Connections.
- Next to Source Connections, click New.
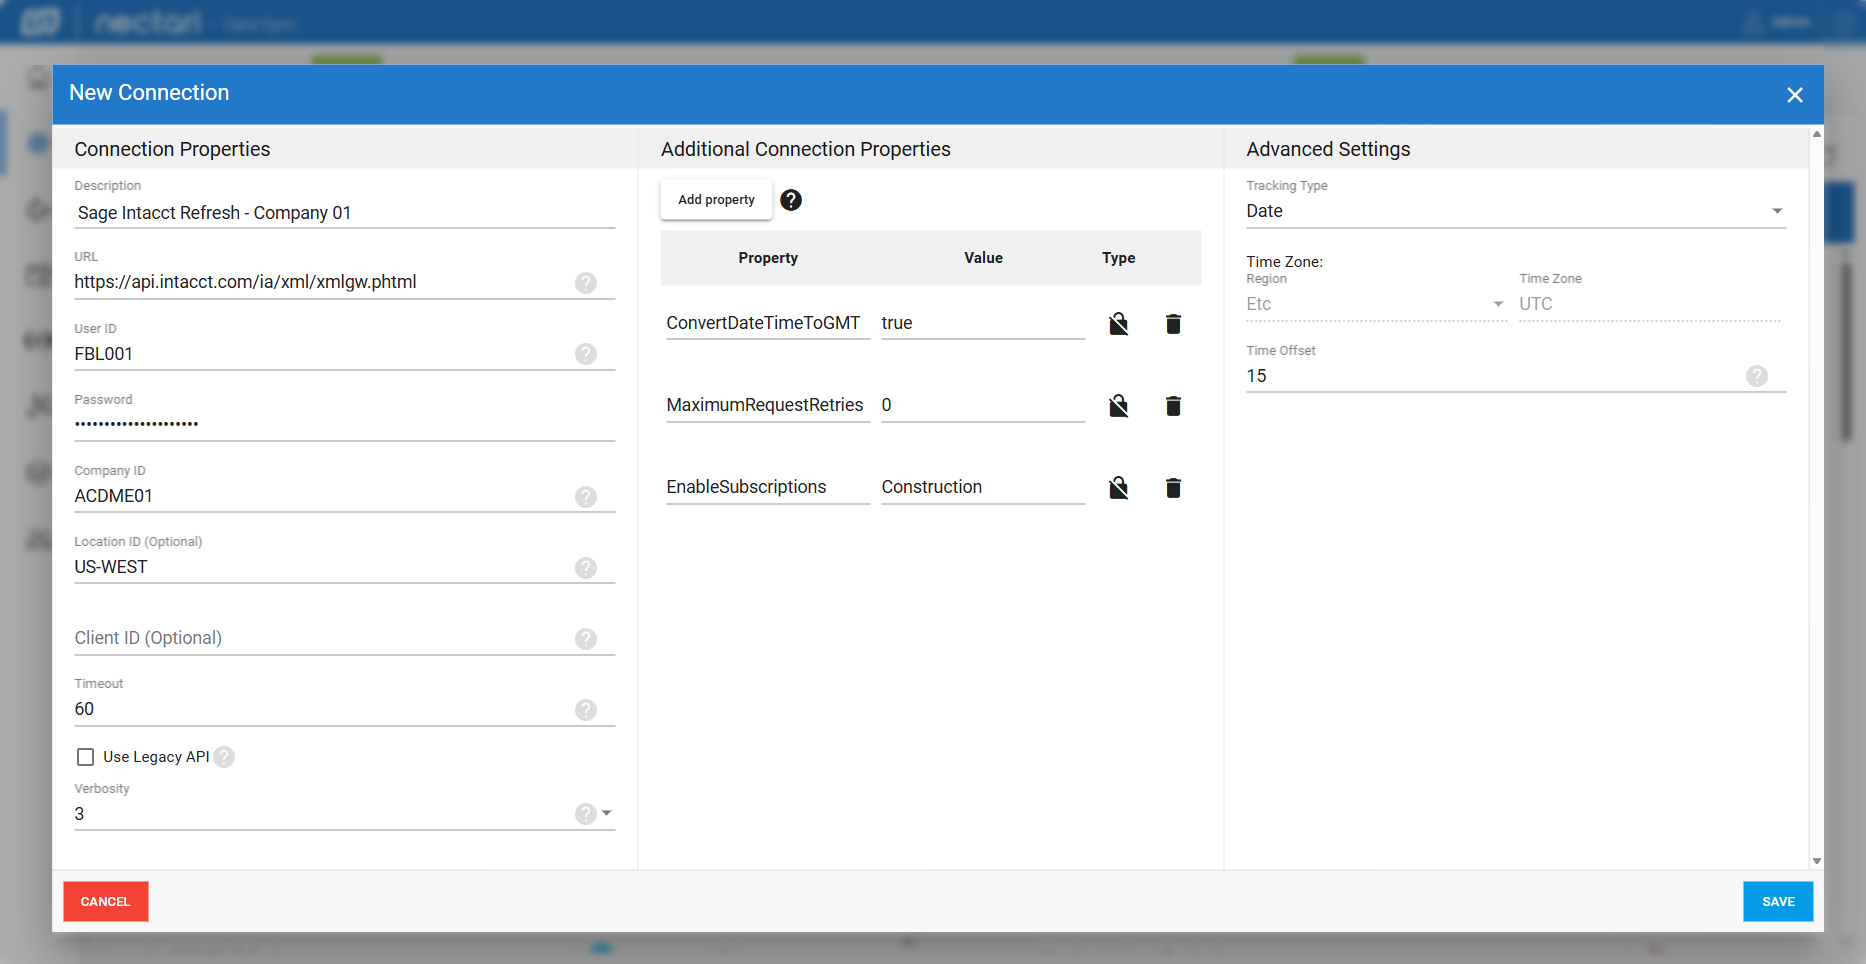
- Select Sage Intacct and fill in the Connection Properties:Description
Sage Intacct Refresh - [Company Name]Replace[Company Name]with the name of the company.URLEnterhttps://api.intacct.com/ia/xml/xmlgw.phtmlUser ID, Password, Company IDThe credentials from the Sage Intacct email. - Clear Use Legacy API.
- In Additional Connection Properties, add
EnableSubscriptionswith the valueConstruction. - In Advanced Settings, set Tracking Type to Date and match the time zone to the Sage Intacct server.
- Click Save, then repeat these steps for each remaining company.
Add a source without refresh
- Next to Source Connections, click New.
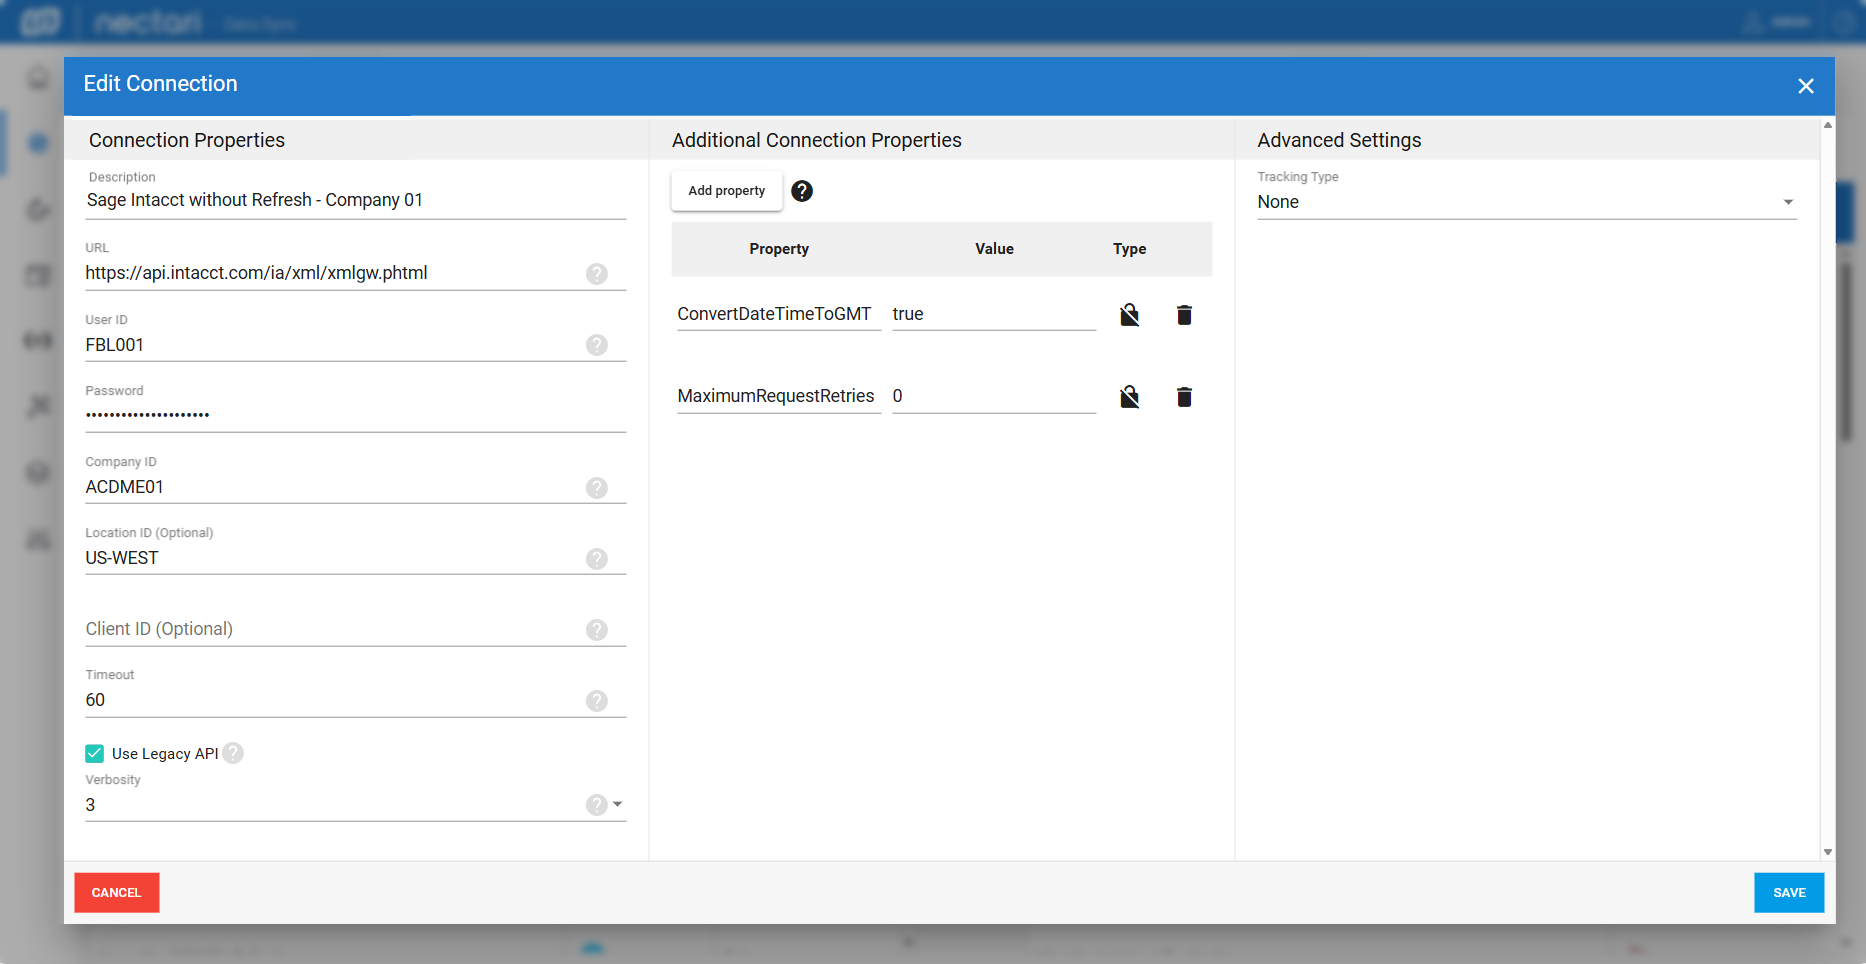
- Select Sage Intacct and fill in the Connection Properties:Description
Sage Intacct without Refresh - [Company Name]Replace[Company Name]with the name of the company.URLEnterhttps://api.intacct.com/ia/xml/xmlgw.phtmlUser ID, Password, Company IDThe credentials from the Sage Intacct email. - Click Save, then repeat these steps for each remaining company.
Create a destination connection
- Next to Destination Connections, click New.
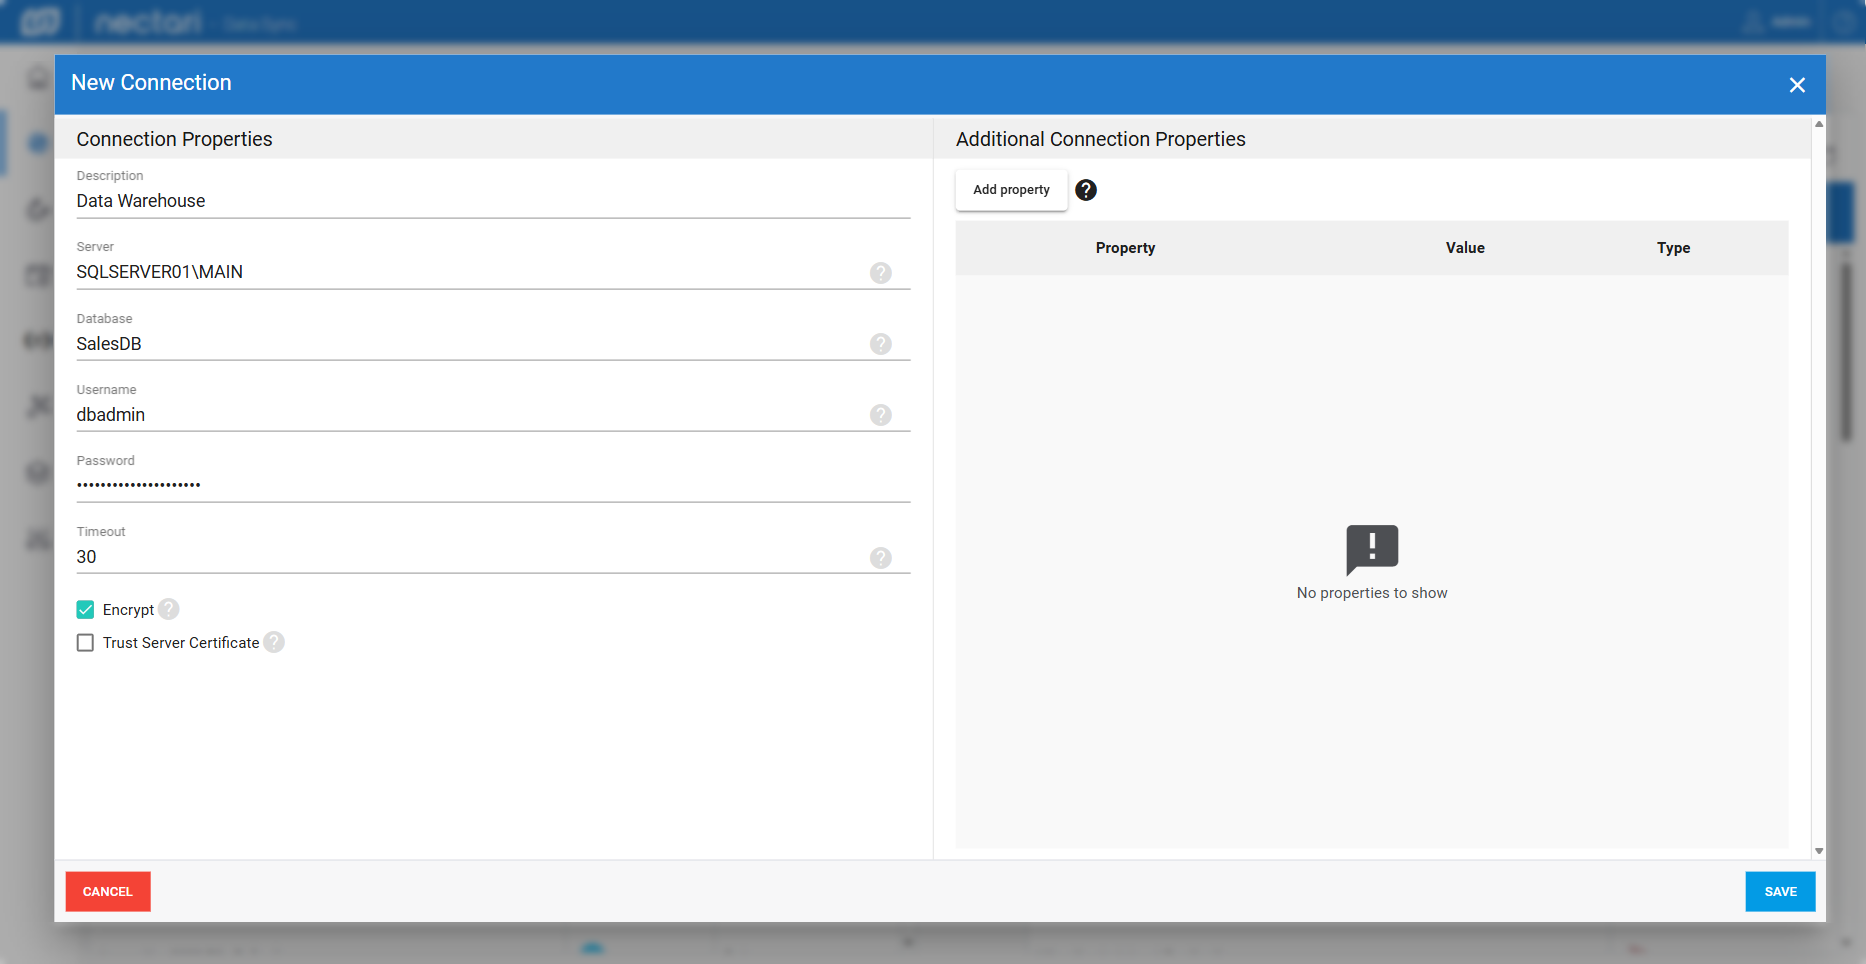
- Select SQL Server or Oracle, depending on your data warehouse.
- In Description, enter
Data Warehouse. - Enter the Server, Database, Username, and Password.
- Click Save.
Configure global variable
- In the sidebar, select Variables, then click New.
- In Variable Name, enter
INTACCT_SCHEMA. - In Variable Type, select String.
- In Variable Value, enter
[YOUR_SCHEMA]. - Click Save.
Import the process deleted records extraction
- In the sidebar, select Extractions, then click Import Extraction in the top right corner.
- Drag the
DS_202X.0.X.XXX_Sage Intacct CONSO Refresh - PD.zipfile, then click Next. - In Description, enter
Sage Intacct PD - [Company Name]. - In Unique Identifier, enter your company name.
- In Column Name, enter
CPYID. - In Source Connection, select Sage Intacct Refresh - [Company Name].
- In Destination Connection, select Data Warehouse.
- In Destination Schema, click Add and enter
Intacct. - Click Import, then repeat these steps for each company.
[Company Name] with the name of the company.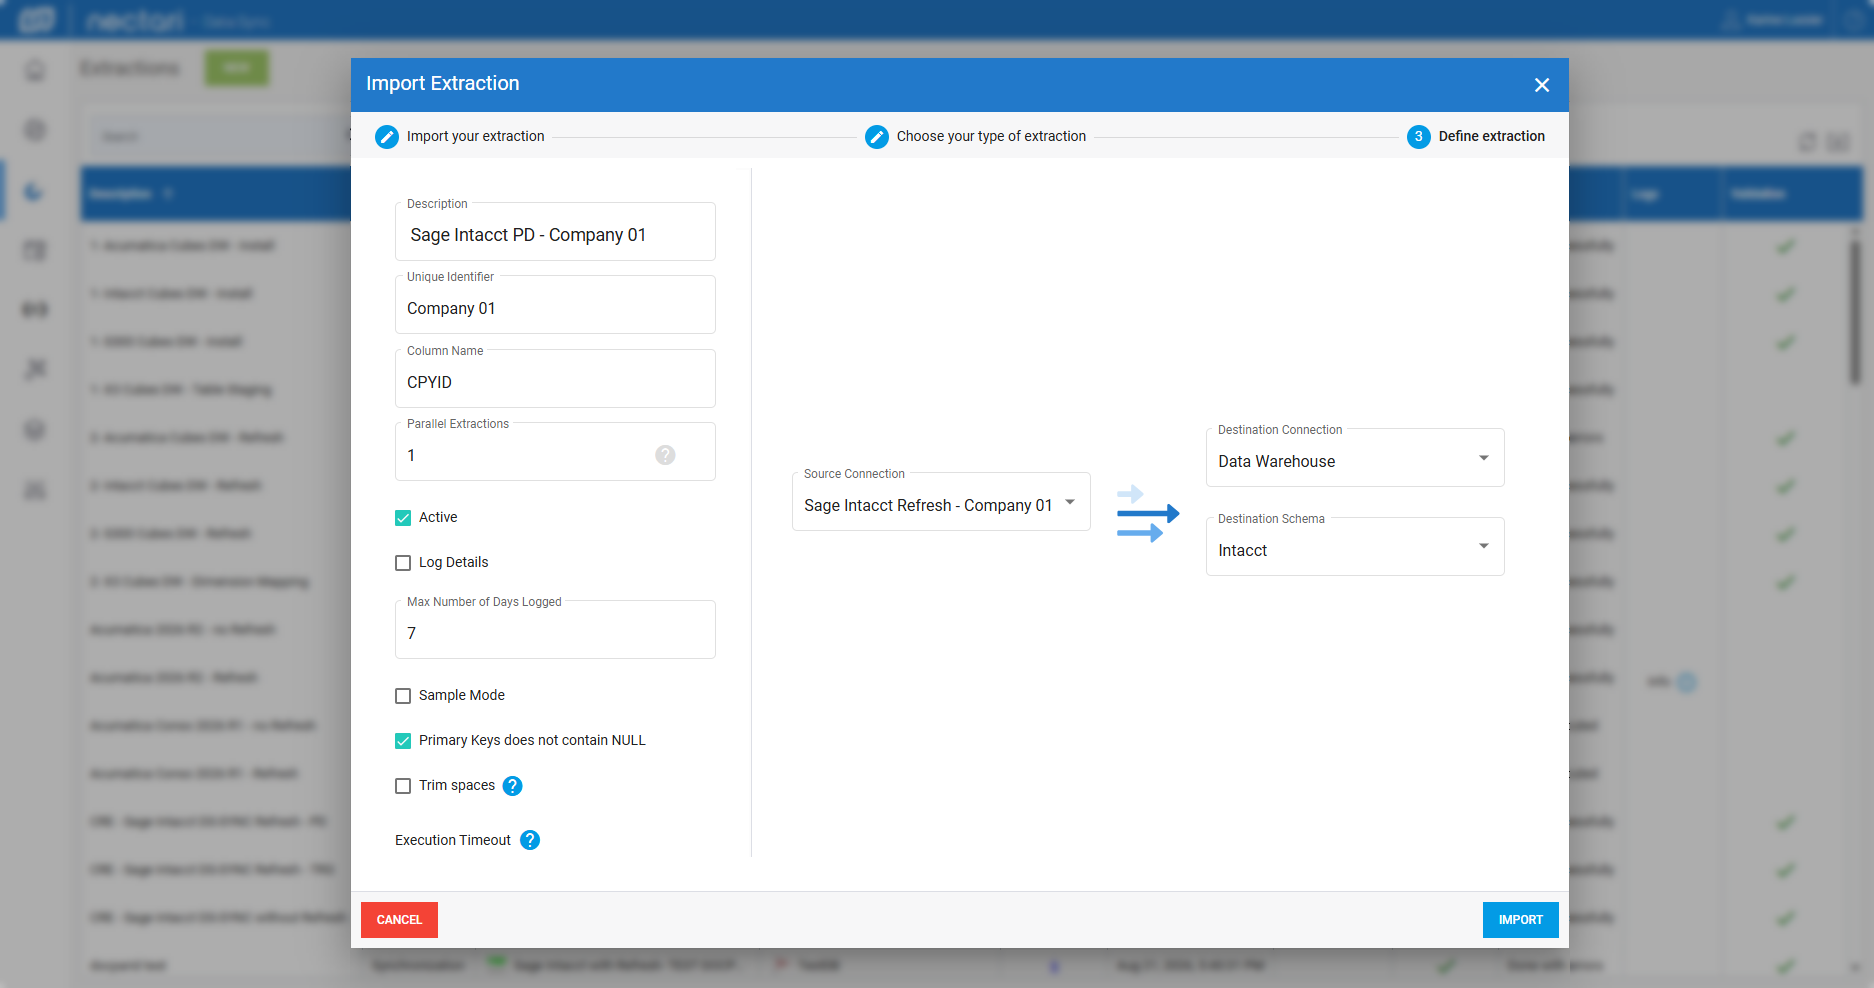
Import the smart events extraction
- Click Import Extraction in the top right corner.
- Drag the
DS_202X.0.X.XXX_Sage Intacct CONSO Refresh - TRG.zipfile, then click Next. - In Description, enter
Sage Intacct TRG - [Company Name]. - In Unique Identifier, enter your company name.
- In Column Name, enter
CPYID. - In Source Connection, select Sage Intacct Refresh - [Company Name].
- In Destination Connection, select Data Warehouse and in Destination Schema, select Intacct.
- Click Import, then repeat these steps for each company.
[Company Name] with the name of the company.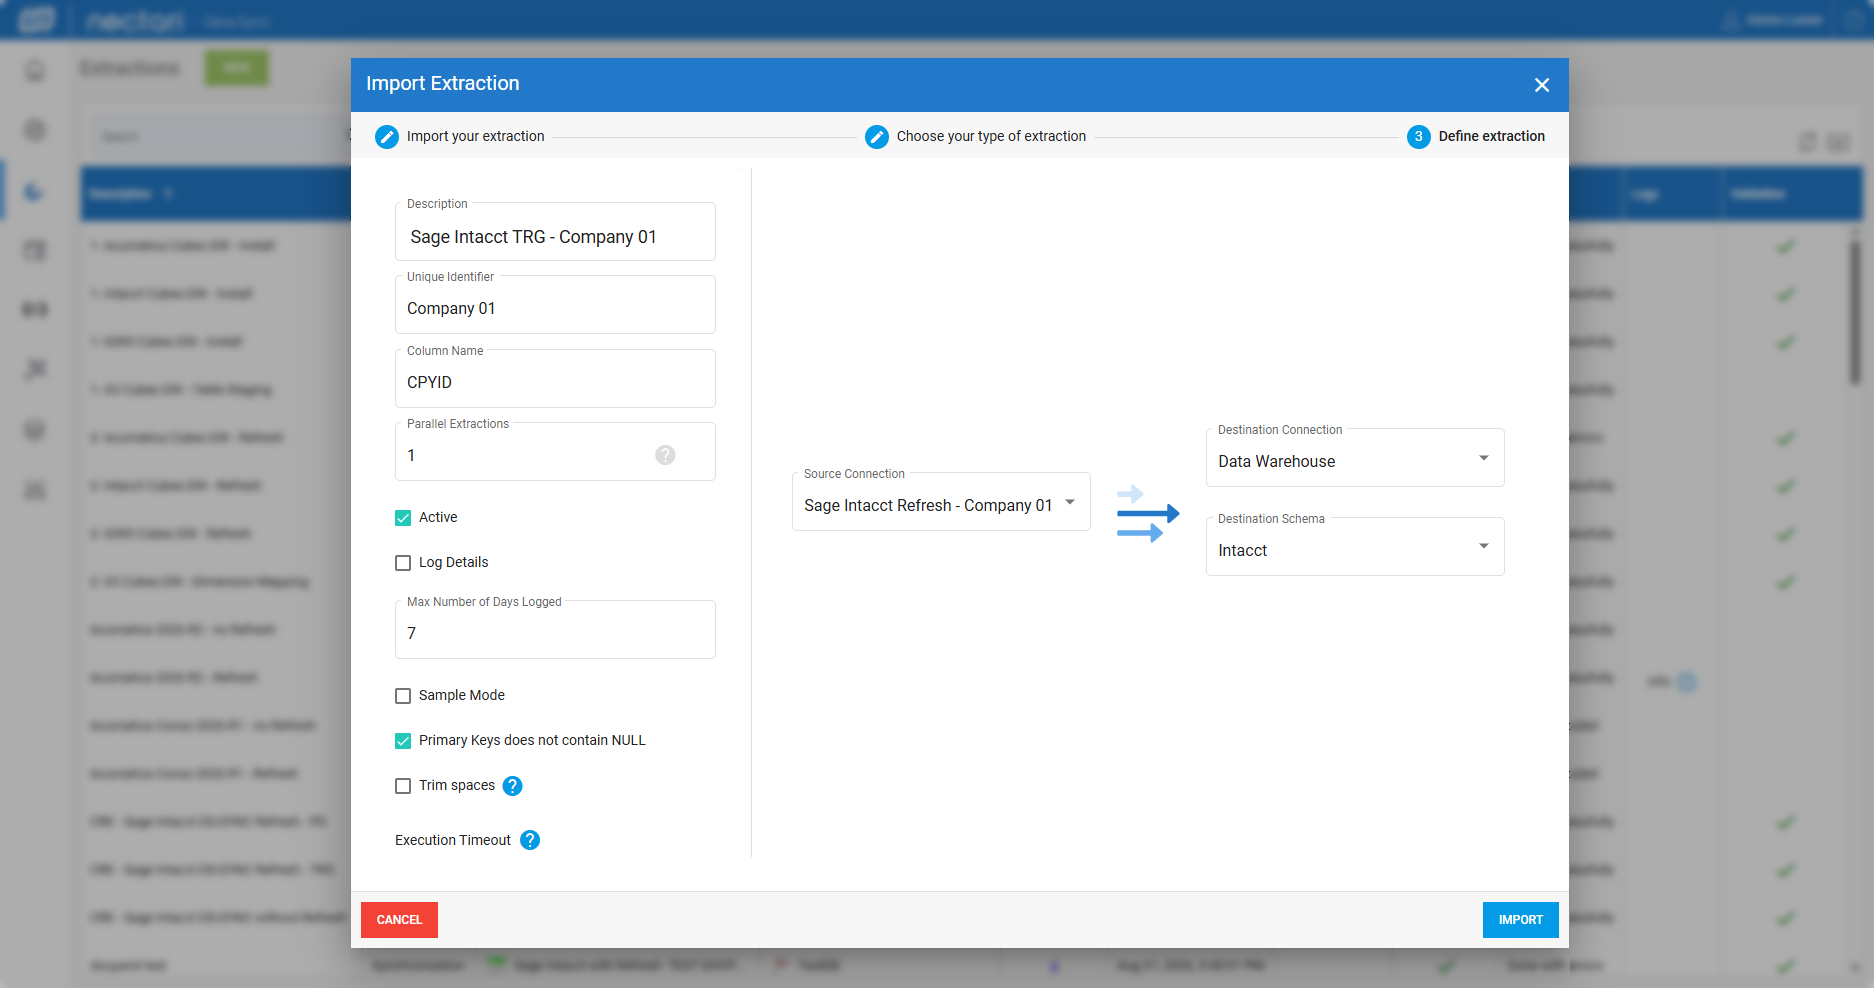
Import the no refresh extraction
- Click Import Extraction in the top right corner.
- Drag the
DS_202X.0.X.XXX_Sage Intacct CONSO NoRefresh.zipfile, then click Next. - In Description, enter
Sage Intacct without Refresh - [Company Name]. - In Unique Identifier, enter your company name.
- In Column Name, enter
CPYID. - In Source Connection, select Sage Intacct without Refresh - [Company Name].
- In Destination Connection, select Data Warehouse and in Destination Schema, select Intacct.
- Click Import, then repeat these steps for each company.
[Company Name] with the name of the company.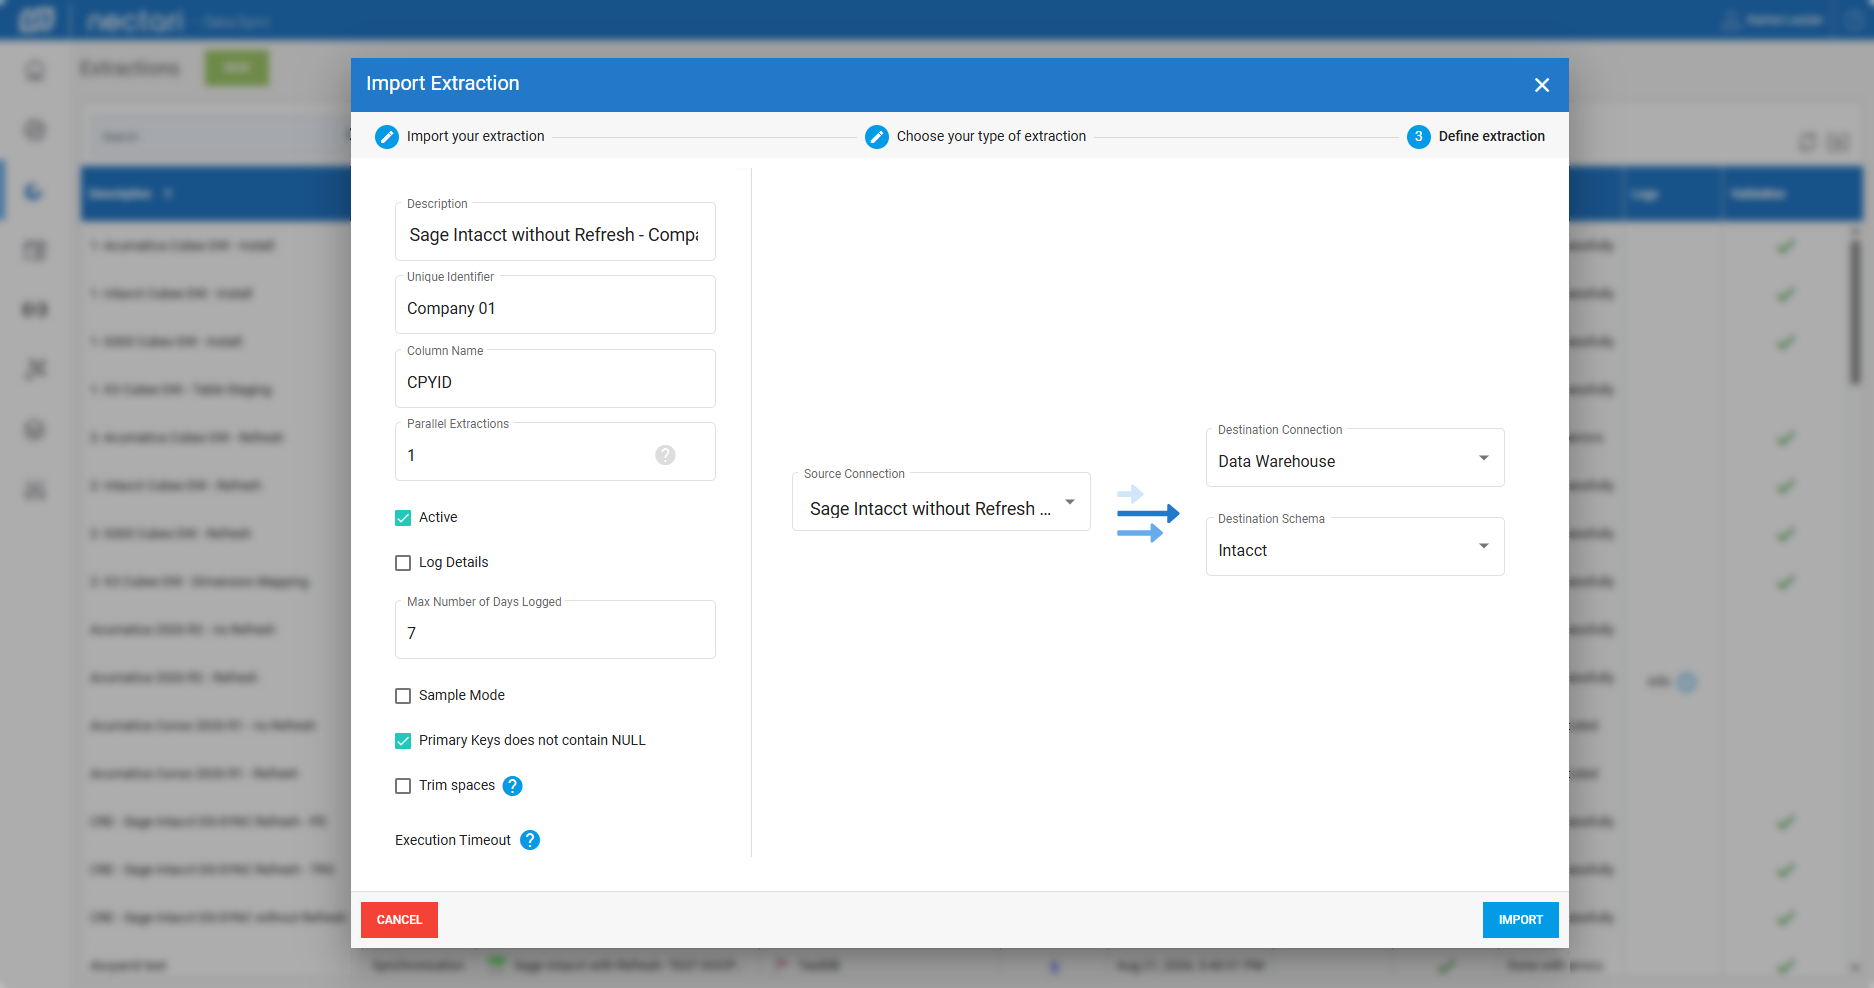
Import the CRE extraction
- Click Import Extraction in the top right corner.
- Drag the
DS_202X.0.X.XXX_Sage Intacct CRE CONSO Refresh.zipfile, then click Next. - In Description, enter
Sage Intacct CRE - [Company Name]. - In Unique Identifier, enter your company name.
- In Column Name, enter
CPYID. - In Source Connection, select Sage Intacct Refresh - [Company Name].
- In Destination Connection, select Data Warehouse and in Destination Schema, select Intacct.
- Click Import, then repeat these steps for each company.
[Company Name] with the name of the company.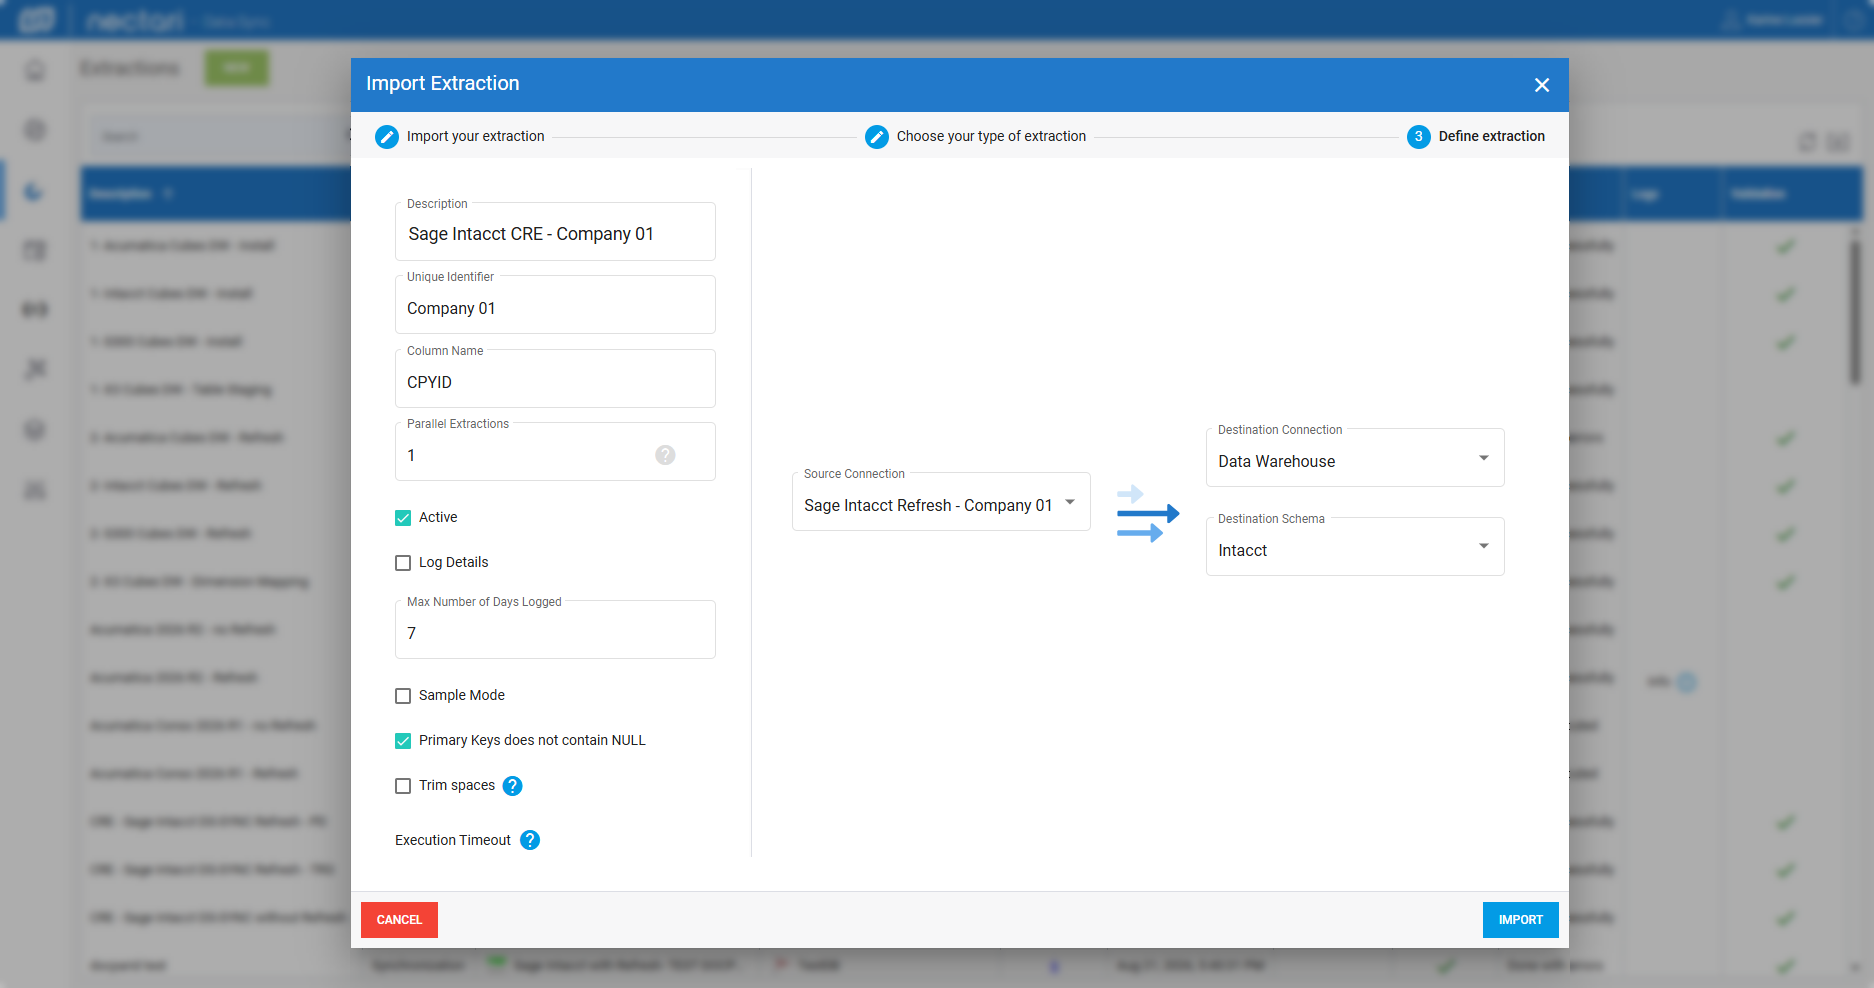
Filter the account balances by period
- Select the Sage Intacct PD and TRG extractions for each company and click the link in the Tables column.
- In the Glaccountbalance table, click the pen icon in the Filter row.
- Enter the following filter. In Period IN, list your period names, including future years, separated by commas:NOT (Openbal=0 and Totdebit=0 and Totcredit=0 and Totadjdebit=0 and Totadjcredit=0 and Forbal=0 and Endbal=0) ANDPeriod IN ('Nectari Opening 2025','Nectari Opening 2026','Nectari Opening 2027','Nectari Opening 2028','Nectari Opening 2029','Nectari Opening 2030')
- Click Save, then repeat these steps for each remaining refresh extraction.
Partition the account balances
- In the Sage Intacct PD and TRG extractions of each company, select the Glaccountbalance table.
- Click Partition Settings in the upper right corner.
- Select Use partition settings.
- In Partition On, select Integer, then in Field, select Accountrec.
- In Minimum Value and Maximum Value, enter your values.
- Click Confirm, then repeat these steps for each remaining refresh extraction.
Run the extractions
- Select the first extraction in the list and click Validate and Build in the top right corner.
- Select Drop the previously created object and recreate the objects based on the new definition.
- Click Build.
- Select the same extraction and click Run Extraction Now.
- Select the tables, set the load mode to Truncate and Load, then click Run.
- Repeat for each remaining extraction.
Schedule an incremental load
- In the sidebar, select Scheduler, then click New.
- In Description, enter
Sage Intacct Incremental Load. - In Action, select Incremental Load.
- In Extraction, select the extractions of each company:
Sage Intacct PD - [Company Name]Sage Intacct TRG - [Company Name]Sage Intacct CRE - [Company Name]
- Select Active.
- In the left panel, select Weekly, then set Start On and At.
- Change the Time Zone if needed, then click Save.
Schedule a full reload
- Click New, then in Description, enter
Sage Intacct Truncate and Load. - In Action, select Truncate and Load.
- In Extraction, select
Sage Intacct without Refresh - [Company Name]for each company. - Select Active.
- In the left panel, select Weekly, then set Start On and At.
- Change the Time Zone if needed, then click Save.
Schedule deleted records processing
- Click New, then in Description, enter
Sage Intacct Process Deleted Records. - In Action, select Process Deleted Records.
- In Extraction, select the extractions of each company:
Sage Intacct PD - [Company Name]Sage Intacct TRG - [Company Name]Sage Intacct CRE - [Company Name]
- Select Active.
- In the left panel, select Daily, then set Start On and At.
- Change the Time Zone if needed, then click Save.
Load large tables by partition
Load by partition
Use loading by partition for large tables. Partition on a date or an integer field, and avoid date fields that can contain future dates.
Configure Sage Enterprise Intelligence for Sage Intacct
Set up the data source
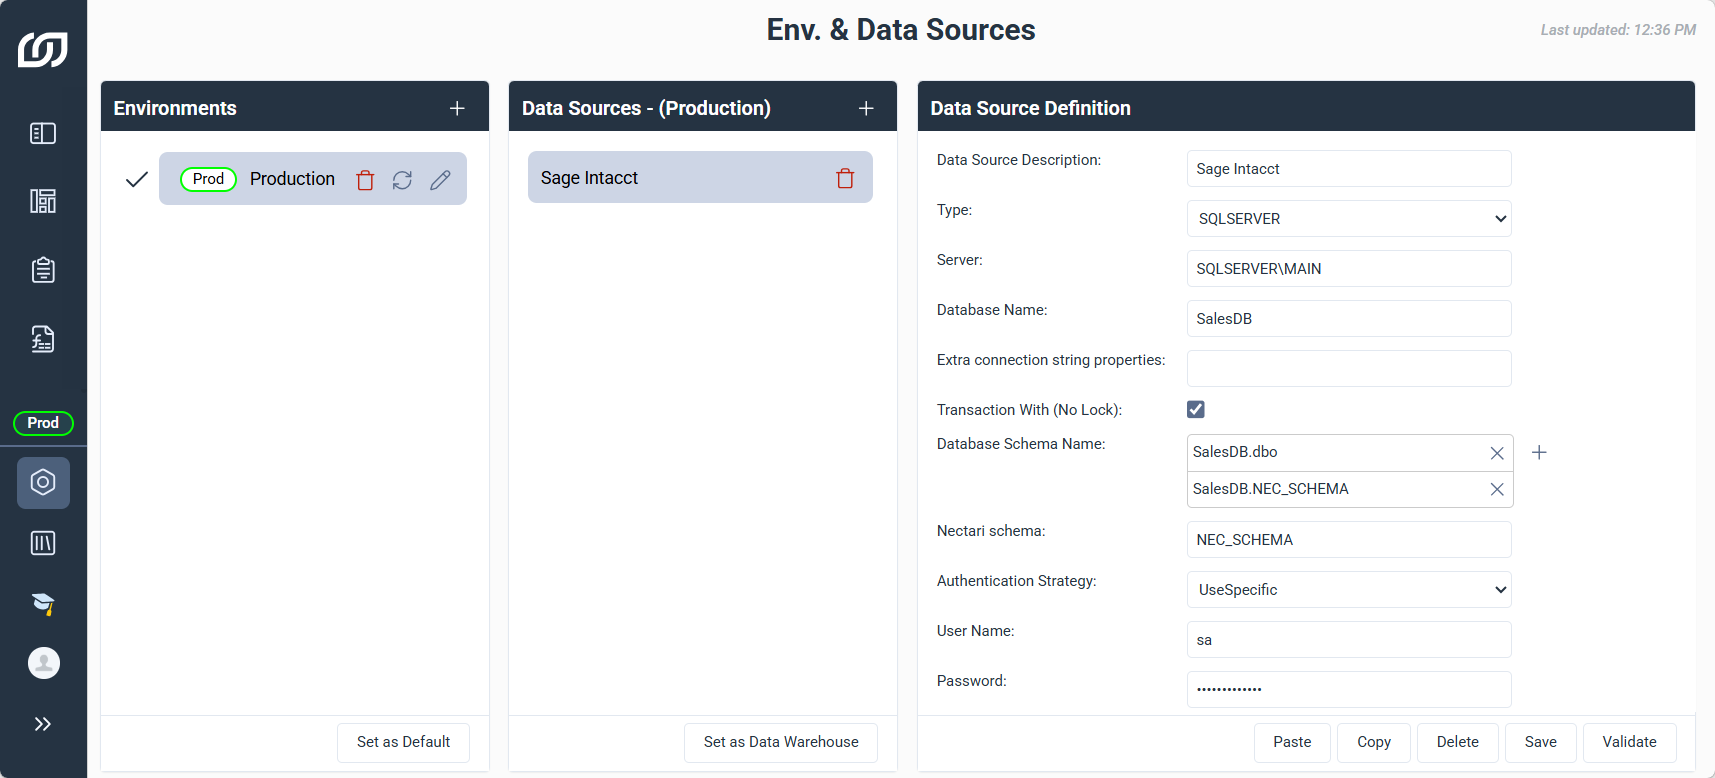
- Log in to Sage Enterprise Intelligence, then click the gear icon in the navigation panel.
- Select Env. & Data Sources.
- In the Data Sources panel, click +.
- In Description, enter
Sage Intacct. - In Type, select SQLSERVER or ORACLE, depending on your data warehouse.
- Fill in the other fields:Database NameSQL ServerData warehouse database name created in DataSync. Case sensitive.SIDOracleData warehouse database name. Case sensitive.PathOracleOracle instance port number.PoolingOracleTurn on pooling and adjust its parameters if needed.Database Schema NameClick + twice and enter
DatabaseName.PRODandDatabaseName.NEC_PROD.ReplaceDatabaseNamewith your database name.NEC_PRODcan use another name, in capital letters only.NEC_PRODEnterNEC_PROD.Authentication StrategySelect UseSpecific.User Name, PasswordSQL Server or Oracle user and password. - Click Validate, then Save.
Connect Sage Intacct for real-time finance
Complete this section only if you use real time financial reporting. Some Excel Add-in formulas return errors with this data source, so review the Sage Intacct real-time formula errors first.
Set up real time data
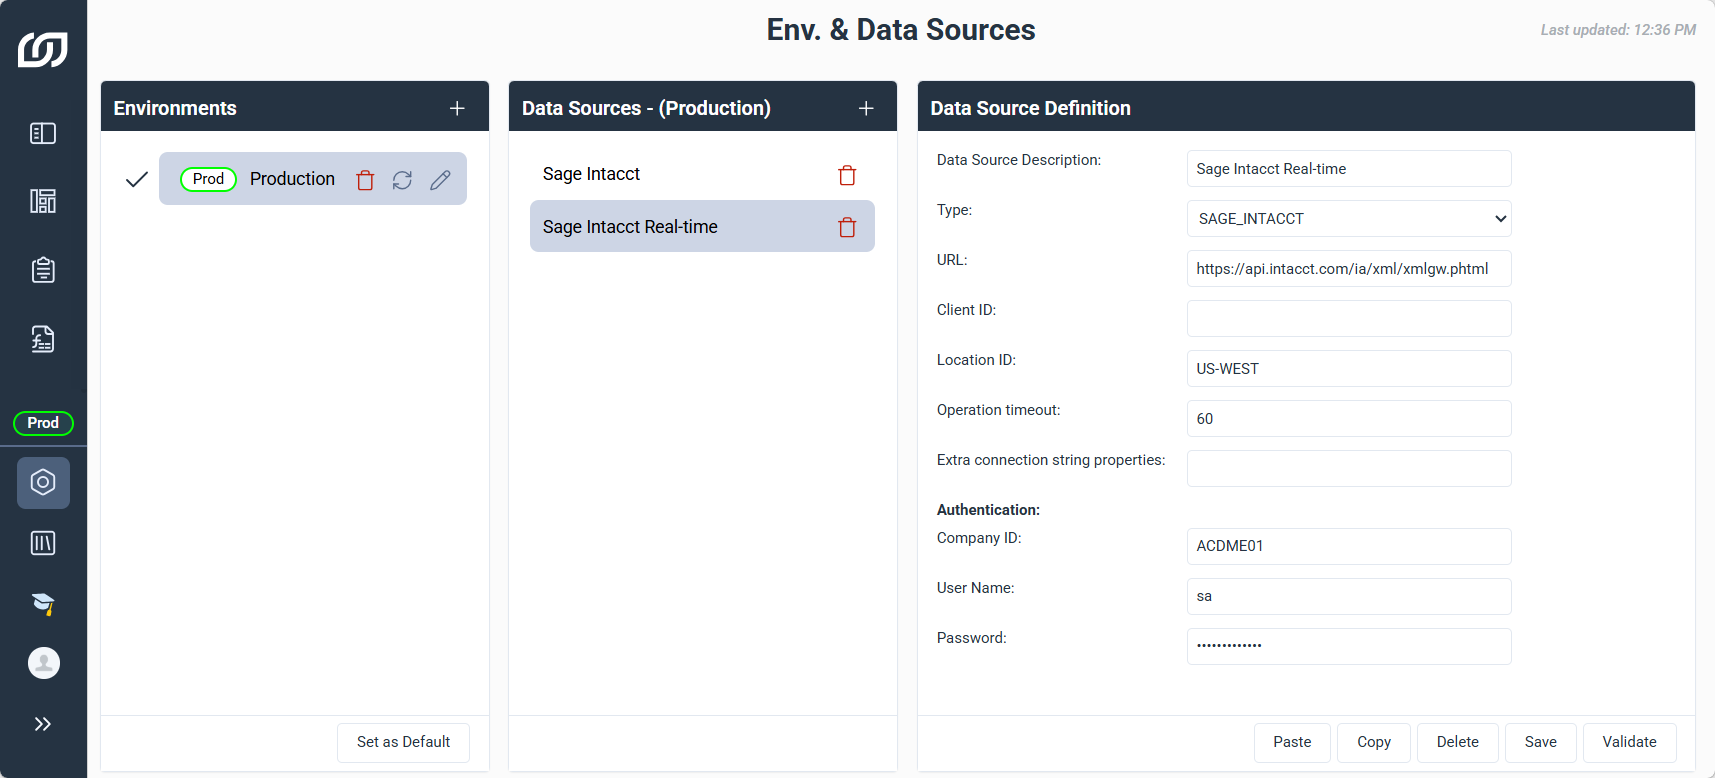
- In the Administration section, select Env. & Data Sources.
- In the Data Sources panel, click +.
- In Description, enter
Sage Intacct Real-time. - In Type, select Sage Intacct.
- Fill in the other fields:URLEnter
https://api.intacct.com/ia/xml/xmlgw.phtmlClient IDOptionalRegistered third party integration ID.Locations IDOptionalLocation ID for multi entity setups.Company IDSage Intacct company ID.User Name, PasswordUser with Web Services access. - Click Validate, then Save.
Import the Sage Intacct template
To embed Sage Enterprise Intelligence in your ERP website or use single sign-on (SSO), change the cookie management settings.
Import the template
- In the sidebar, expand Templates, then click Import Template.
- Select the template zip file from
...\Templates - Official\20XX Release X\Sage Intacct\WebServer. - In Current Data Sources Description, click Bind a Data Source and select Sage Intacct Data Source.
- Click Next.
- In Data Models, clear Add for the objects to skip, then click Next.
- Select the environment.
- Enter
NEC_PRODin Schema for Custom Objects andPRODin Schema for Sage Intacct. - Click Next and review the execution report.
Add Sage Intacct custom fields
Complete this section only if your reports use custom fields on purchase or sales documents.
Add DocParID
- Log in to DataSync, then click Connections.
- Select the Sage Intacct Refresh source connection and click the pen icon.
- In Additional Connection Properties, click Add property and select Encrypted.
- In Property, enter
DocParID. - In Value, enter the document type, such as
Vendor Invoice. - Click Save.
DocParID accepts one document type per connection. For another type, create another source connection.Import purchase order
- In the sidebar, select Extractions, then click Import Extraction in the top right corner.
- Drag the
DS_202X.0.X.XXX_Sage Intacct PO DOCPARID CONSOfile, then click Next. - In Description, enter
Sage Intacct Purchase Order. - In Unique Identifier, enter your company name.
- In Column Name, enter
CPYID. - In Source Connection, select Sage Intacct Refresh.
- In Destination Connection, select Data Warehouse and in Destination Schema, select Intacct.
- Click Import.
Import sales order
- Click Import Extraction in the top right corner.
- Drag the
DS_202X.0.X.XXX_Sage Intacct SO DOCPARID CONSOfile, then click Next. - In Description, enter
Sage Intacct Sales Orders. - In Unique Identifier, enter your company name.
- In Column Name, enter
CPYID. - In Source Connection, select Sage Intacct Refresh.
- In Destination Connection, select Data Warehouse and in Destination Schema, select Intacct.
- Click Import.
Run the extractions
- Select the first extraction in the list and click Validate and Build in the top right corner.
- Select Drop the previously created object and recreate the objects based on the new definition.
- Click Build.
- Select the same extraction and click Run Extraction Now.
- Select the tables, set the load mode to Truncate and Load, then click Run.
- Repeat for each remaining extraction.
Sync custom fields
- In Extractions, select the Sage Intacct Purchase Order extraction and click the link in the Tables column.
- For each table, click the link in the column.
- Select Sync for each custom field you want to add.
- Repeat for the Sage Intacct Sales Order extraction.
Set up the Sage Intacct OLAP cubes
Complete this section only if you have the Data Management add-on and use the Sales and Finance cubes. The cubes run on a separate data warehouse database, so they need their own source connection and extractions.
Add the source connection
- Log in to DataSync, then click Connections.
- Next to Source Connections, click New.
- Select SQL Server and fill in the Connection Properties:DescriptionEnter
Data Warehouse (Source).ServerData warehouse server, such asSQLSERVER01\MAIN.DatabaseData warehouse database, such asSalesFinance.Username, PasswordData warehouse database user and password. - Clear Use Legacy API.
- In Advanced Settings, set Tracking Type to Date and match the time zone to the Sage Intacct server.
- Click Save.
Import the table staging extraction
- In the sidebar, select Extractions, then click Import Extraction in the top right corner.
- Drag the
DS_20XX.0.X.XXX_Sage Intacct OLAP ETL Staging.zipfile, then click Next. - In Description, enter
Cube - Table Staging. - In Source Connection, select Data Warehouse (Source).
- In Destination Connection, select Data Warehouse.
- In Source Schema and Destination Schema, select
PROD. - Click Import.
Import the dimension mapping extraction
- Click Import Extraction in the top right corner.
- Drag the
DS_20XX.0.X.XXX_Sage Intacct OLAP ETL Refresh.zipfile, then click Next. - In Description, enter
Cube - Dimension Mapping. - In Source Connection, select Data Warehouse (Source).
- In Destination Connection, select Data Warehouse.
- In Source Schema and Destination Schema, select
PROD. - Click Import.
Run the cube extractions
- Select the first extraction in the list and click Validate and Build in the top right corner.
- Select Drop the previously created object and recreate the objects based on the new definition.
- Click Build.
- Select the same extraction and click Run Extraction Now.
- Select the tables, set the load mode to Truncate and Load, then click Run.
- Repeat for each remaining extraction.
Set the data warehouse
- Log in to Sage Enterprise Intelligence, then click the gear icon in the navigation panel.
- Select Env. & Data Sources.
- Select the Sage Intacct data source and click Set as Data Warehouse.
- In the Data Source Definition panel, select Columnstore indexes.
- Click Validate, then Save.
Build and load the cubes
- Select OLAP Manager in the sidebar, then click Manage in the right panel.
- Select all the template cubes from the list.
- In the Manage panel, select the environment.
- Click Confirm, select the checkbox to confirm that current cube data will be lost, then click Yes.
- Click Manage again and select all the built cubes.
- In Action, select Load All and the environment, then click Confirm.
Schedule the cubes
Schedule regular refresh jobs to refresh or reload your OLAP cubes.
Sage Intacct template installation complete
The Sage Intacct template is installed. To adapt it to your company and see what it contains, continue with these pages: